
Some weeks ago I’ve ordered a so called “Plug Computer”.
These Computers are very small devices with an ARM SoC.
They are pretty cheap! I’ve got my PogoplugV2 for 10€ 🙂
I was lucky and got the gray version 😀
Some device info:
- ARMv5te CPU (Marvell Kirkwood 1.2GHz)
- 256MB RAM
- 128MB NAND
- 4 USB 2.0 Ports
Pretty great to use this device as a small homeserver/fileserver. Remember 10€!
I want to use my Pogoplug as a fileserver (for Windows PCs) and DLNA server to stream to my TV.
On top of that maybe some additional stuff in the feature 😉
But the default software sucks. No Samba support, no DLNA, no FTP, …
But this doesn’t matter because there is an Arch Linux for ARM Port.
This is an instruction how to install Arch Linux on a PogoplugV2.
Everything after the Arch Linux installation (Install Webmin, Samba, DLNA, …) can be used for all devices which run Arch Linux for ARM.
Prepare device and install Arch Linux

Everything we have to do to install Arch Linux are 4 steps.
- Enabe SSH Access
- Format an USB Stick (min. 2GB size)
- Flash a custom Bootloader to boot from your USB Stick
- Install Arch Linux
An instruction how to do that is available here: http://archlinuxarm.org/platforms/armv5/pogoplug-v2-pinkgray
There are instuctions for other devices as well.
If you use Windows use PuTTY as a SSH client.
Setup everything
1. Login via SSH
Use PuTTY or another SSH client to access your Pogoplug.
username: root
password: root
2. Change your root password
First you should change your root password.
Use the following command to do so:
passwd root
3. Update Arch Linux
Arch Linux has an own package manager called pacman.
With pacman you can install/remove packages and update Arch Linux.
To update Arch Linux use the following command:
pacman -Syu
4. Change hostname and timezone
Note: For GUI lovers: skip this step and set hostname and timezone in the webmin interface (next step)
The default hostname is “alarm”. Let’s change it!
hostnamectl set-hostname myhostname
To get all available timezones use:
timedatectl list-timezones
And to set your timezone:
timedatectl set-timezone <Zone>/<SubZone>
For example:
timedatectl set-timezone Europe/Berlin
Now reboot:
reboot
Wait a few seconds and reconnect to SSH.
5. Install Webmin
Webmin is a pretty cool web-based interface for system administration.
It’s easy to use and will help you to configure stuff faster.
To install it use:
pacman -Sy webmin perl-net-ssleay
Now we have to allow access from more IP addresses.
You have to edit the configuration file.
nano /etc/webmin/miniserv.conf
Find the following line: allow=127.0.0.1
Now add a new allow line with your local network broadcast ip or a specific ip and save the file.
For example:
allow=127.0.0.1 ## Allow local access
allow=192.168.0.0 ## Allows all users from 192.168.0.1 - 192.168.0.255
Now we’ll enable & start the webmin service so it autostarts.
systemctl enable webmin
systemctl start webmin
To access the Webmin interface open a browser and go to:
https://deviceip:10000
To lower memory usage go to:
Webmin>Webmin Configuration>Advanced Configuration and disable “Pre-load Webmin functions library?”
6. USB Auto Mount
If you want to remove your USB HDD and use it anywhere else it would be cool to have automounting like Windows.
There are a lot of auto mounting mechanisms for Arch Linux but a lot of them are outdated.
This one is using udevil to auto mount all USB HDDs on attach as /media/PARTITION_LABEL. So make sure all partitions have a label!
pacman -Sy udevil
I want to access my HDDs via Samba to use them in Windows so I have to use either FAT32 or NTFS.
This sucks because FAT32 isn’t able to handle files >4GB so it’s useless.
And NTFS is fucking slow on Linux.
But with some special mount options we are able to increase the speed dramatically!
I’ve did some benchmarks with hdparm and dd before and after the optimization.
The read speed was pretty good already (about 29MB/s –> USB 2.0 limit).
But the write speed was really bad!
Before: ~6,5 MB/s write speed
After: ~28,5 MB/s write speed
As you can see the write speed on NTFS was really slow before. But there is a way to fix it 🙂
We have to edit the mount options and add a special ntfs-3g option to our udevil automount settings.
Open the udevil config file and edit it:
nano /etc/udevil/udevil.conf
Search for default_options_ntfs= and allowed_options=
Now we add the option “big_writes” to both lines so it looks like:
..., noatime, big_writes, uid=...
Save the file.
Create the /media directory
mkdir /media
Add the udevil service to autostart.
systemctl enable devmon@root
Let’s reboot to see whether it works
reboot
Wait a few seconds and reconnect to SSH.
Now you’ll have a new folder: /media/yourHDDname where your HDD is mounted.
And you should see something like /dev/sdX1 on /media/… if you type:
mount
Note: All USB HDDs should go to standby automatically.
You can check with:
hdparm -C /dev/sda
7. Blink LED to HDD activity
The PogoplugV2 has a green and orange LED.
So I thought it would be a cool idea change the color to HDD activity.
I’ve created an systemd service.
———————————
Only If you have a PogoplugV2!
You have to correct your arcNumber and matchid because there is a bug in the current uboot and your Pogoplug isn’t detected as a PogoplugV2.
pacman -Sy uboot-env
fw_setenv arcNumber 3542
fw_setenv machid dd6
reboot
———————————
We need the iostat binary to create our own deamon.
Iostat will check hdd activity.
pacman -Sy sysstat
Create a new file called /usr/lib/systemd/system/blinkled.service with the following content:
[Unit]
Description=Blink LED if hard drive is active daemon

[Service]
Type=oneshot
ExecStart=/usr/local/bin/blinkled
ExecStop=/usr/bin/killall iostat
RemainAfterExit=true

[Install]
WantedBy=multi-user.target
Create another file called /usr/local/bin/blinkled
This command is pretty long 😉 It will execute iostat every 3 seconds. If there is HDD activity the Pogoplug will start to blink orange.
You can change heartbeat to default-on or timer as well.
#!/bin/bash
/usr/bin/iostat -z -d 3 | /usr/bin/sed -u -e '1d' -e 's/Device.*/none/' -e 's/sd.*/heartbeat/' -e '/^$/d' > /sys/class/leds/status:orange:fault/trigger &
And make it executable
chmod u+x /usr/local/bin/blinkled
To start our service use:
systemctl start blinkled
To autostart use:
systemctl enable blinkled
8. Update Kernel to >3.2
Warning: This specific instruction works for PogoplugV2 only!
You can brick your device!
The current kernel for PogoplugV2 is 3.1.x but 3.8.x or newer is available.
You have to update manually because newer kernels need a new uboot.
You need the newest uboot to boot Kernels >3.2 so you have to install it before:
If this is a fresh installation you probably have the newest uboot already and you don’t have to do that!
cd /tmp
wget http://jeff.doozan.com/debian/uboot/install_uboot_mtd0.sh
chmod +x install_uboot_mtd0.sh
./install_uboot_mtd0.sh
Then you have to correct your arcNumber and matchid if you didn’t follow “Blink LED to HDD activity”.
pacman -Sy uboot-env
fw_setenv arcNumber 3542
fw_setenv machid dd6
reboot
Now you can install the new Kernel files with:
pacman -Sy linux-kirkwood linux-headers-kirkwood
reboot
9. Install Samba
10. Install MiniDLNA
Install MiniDLNA and enable the service.
pacman -Sy minidlna
systemctl enable minidlna
Now edit the config file
nano /etc/minidlna.conf
It’s pretty easy to understand the config file and the documentation is well.
You have to set at least one media_dir
All USB devices are mounted at /media/DEVICE_LABEL
For example:
media_dir=V,/media/zincobi/Videos
Here are some additional options you could set:
friendly_name=POGOPLUG DLNA Server
db_dir=/var/cache/minidlna
log_dir=/var/log
presentation_url=http://YOUR_DEVICE_IP_HERE:8200/
MiniDLNA will update the DB automatically.
If you have a lot of files (>8192) you should increase your max inotify value for a single user so MiniDLNA can watch all files.
Create /etc/sysctl.d/90-inotify.conf and insert the following:
# Increase inotify max watchs per user for local minidlna
fs.inotify.max_user_watches = 100000
MiniDLNA is able to use thumbnails or cover images.
I’ve created a small bash script which will generate thumbnails for videos recursively.
You need ffmpegthumbnailer to create these thumbnails.
pacman -Sy ffmpegthumbnailer
Let’s create the script:
nano /usr/local/bin/generateThumbs.sh
This script will generate a thumbnails for every video file recursively.
You can add even more extensions to the TYPES array.
#!/bin/bash

DIR=$1

if [ -z "$DIR" ]; then
	printf "%sn" "This script will generate thumbnails for all video files inside the given directory"
	printf "%sn" "moviexy.avi --> moviexy.jpg"
	printf "%sn" "ffmpegthumbnailer is required"
	printf "%sn" "Usage: generateThumbs "
	exit 1
fi

TYPES=( mov mp4 avi mkv m4v xvid divx wmv mpg mpeg )

# Create a regex of the extensions for the find command
TYPES_RE="\("${TYPES[1]}
for t in "${TYPES[@]:1:${#TYPES[*]}}"; do
    TYPES_RE="${TYPES_RE}\|${t}"
done
TYPES_RE="${TYPES_RE}\)"

find "$DIR" -regex ".*.${TYPES_RE}" -type f | while read -r FILEPATH
do
	printf "%sn" "--- Start Thumbnailcreation for ---"
	printf "%sn" "$FILEPATH"
	THUMBFILE="${FILEPATH%.*}.jpg" # remove video ext. and add .jpg
	if [ -f "$THUMBFILE" ]; then
		printf "e[1;33m%se[0mn" "Thumbnail exists"
	else
		printf "e[1;32m%se[0mn" "Generating thumbnail..."
		ffmpegthumbnailer -i "$FILEPATH" -o "$THUMBFILE" -s 160 -q 10
	fi
	printf "%sn" "--- End Thumbnailcreation ---"
done
exit 0
See: https://github.com/Obihoernchen/generateThumbs
Make it executable:
chmod u+x /usr/local/bin/generateThumbs.sh
Execute it with something like:
generateThumbs.sh /media/YOURDEVICELABEL/Videos
Now start MiniDLNA
systemctl start minidlna
12. Configure static IP
Be careful you can mess up your whole network connection!
I don’t like dynamic IP addresses in my LAN. Especially for servers.
They should have a static IP like every server. Of course there are hostnames but not all devices are able to resolve them.
Arch uses netcfg to configure your network adapters. You can create multiple profile.
To create a new static ip profile create a new profile in /etc/network.d/ named wired-static-eth0
nano /etc/network.d/wired-static-eth0
And add the following content, replace everything with your values and save the file.
Note: I use custom DNS settings because my router doesn’t allow me to edit DNS settings.
CONNECTION='ethernet'
DESCRIPTION='A basic static ethernet connection using iproute'
INTERFACE='eth0'
IP='static'

#IP of your pogoplug
ADDR='192.168.0.2'

#ROUTES=('192.168.0.0/24 via 192.168.1.2')

#Gateway (For example your router)
GATEWAY='192.168.0.1'

#DNS set to ('Gateway IP') if you want to use the DNS your router provides
DNS=('8.8.8.8' '8.8.4.4')

## For IPv6 autoconfiguration
#IP6=stateless
## For IPv6 static address configuration
#IP6='static'
#ADDR6=('1234:5678:9abc:def::1/64' '1234:3456::123/96')
#ROUTES6=('abcd::1234')
#GATEWAY6='1234:0:123::abcd'
Now you need to change the default network profile to the new one.
nano /etc/conf.d/netcfg
Find NETWORKS= and edit it:
NETWORKS=(wired-static-eth0)
You have to be sure that everything is correct otherwise you are going to loose network connection and have to edit all files from your USB stick with another PC.
Just restart the netcfg service or restart to apply the new settings
systemctl restart netcfg
13. Enable color in Bash prompt
The current terminal doesn’t look that nice. Everything is white and boring…
But we can change this so your terminal will look like this:
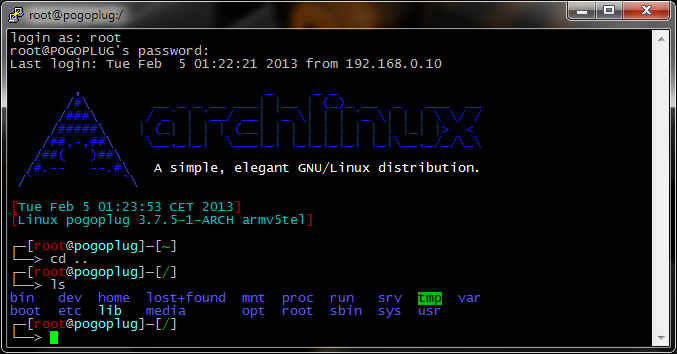
Just replace /etc/bash.bashrc with the following content:
# /etc/bash.bashrc
#
# https://wiki.archlinux.org/index.php/Color_Bash_Prompt
#
# This file is sourced by all *interactive* bash shells on startup,
# including some apparently interactive shells such as scp and rcp
# that can't tolerate any output. So make sure this doesn't display
# anything or bad things will happen !

# Test for an interactive shell. There is no need to set anything
# past this point for scp and rcp, and it's important to refrain from
# outputting anything in those cases.

# If not running interactively, don't do anything!
[[ $- != *i* ]] && return

# Bash won't get SIGWINCH if another process is in the foreground.
# Enable checkwinsize so that bash will check the terminal size when
# it regains control.
#  (E11)
shopt -s checkwinsize

# Enable history appending instead of overwriting.
shopt -s histappend

case ${TERM} in
        xterm*|rxvt*|Eterm|aterm|kterm|gnome*)
                PROMPT_COMMAND=${PROMPT_COMMAND:+$PROMPT_COMMAND; }'printf "\033]0;%s@%s:%s\007" "${USER}" "${HOSTNAME%%.*}" "${PWD/#$HOME/~}"'
                ;;
        screen)
                PROMPT_COMMAND=${PROMPT_COMMAND:+$PROMPT_COMMAND; }'printf "\033_%s@%s:%s\033\\" "${USER}" "${HOSTNAME%%.*}" "${PWD/#$HOME/~}"'
                ;;
esac

# fortune is a simple program that displays a pseudorandom message
# from a database of quotations at logon and/or logout.
# Type: "pacman -S fortune-mod" to install it, then uncomment the
# following line:

# [[ "$PS1" ]] && /usr/bin/fortune

# Welcome Message
# Arch Linux Logo Welcome Message
c1="$(tput sgr0)$(tput setaf 4)"
c2="$(tput bold)$(tput setaf 4)"
c3="$(tput bold)$(tput setaf 0)"
echo
echo "        $c2,$c1                       _     _ _"
echo "       $c2/$c1#$c2\\$c1        __ _ _ __ ___| |__ | (_)_ __  _   ___  __"
echo "      $c2/$c1###$c2\\$c1      / _\` | '__/ __| '_ \\| | | '_ \\| | | \\ \\/ /"
echo "     $c2/$c1#####$c2\\$c1    | (_| | | | (__| | | | | | | | | |_| |>  <"
echo "    $c2/$c1##,-,##$c2\\$c1    \\__,_|_|  \\___|_| |_|_|_|_| |_|\\__,_/_/\\_\\"
echo "   $c2/$c1##(   )##$c2\\$c1"
echo "  $c2/$c1#.--   --.#$c2\\  $c3 A simple, elegant GNU/Linux distribution."
echo " $c2/$c1\`           \`$c2\\$(tput sgr0)"$'\n'

# Show date
DATE="$(tput setaf 1)[$(tput setaf 6)$(date)"
DATE="${DATE}$(tput setaf 1)]"
echo $DATE
# Show kernel info
KERNEL="$(tput setaf 1)[$(tput setaf 6)$(uname -srmn)"
KERNEL="${KERNEL}$(tput setaf 1)]"
echo "$KERNEL"$'\n'
# Reset colors
tput sgr0

# Set colorful PS1 only on colorful terminals.
# dircolors --print-database uses its own built-in database
# instead of using /etc/DIR_COLORS. Try to use the external file
# first to take advantage of user additions. Use internal bash
# globbing instead of external grep binary.

# sanitize TERM:
safe_term=${TERM//[^[:alnum:]]/?}
match_lhs=""

[[ -f ~/.dir_colors ]] && match_lhs="${match_lhs}$(<~/.dir_colors)"
[[ -f /etc/DIR_COLORS ]] && match_lhs="${match_lhs}$(</etc/DIR_COLORS)"
[[ -z ${match_lhs} ]] \
        && type -P dircolors >/dev/null \
        && match_lhs=$(dircolors --print-database)

if [[ $'\n'${match_lhs} == *$'\n'"TERM "${safe_term}* ]] ; then

        # we have colors <img src="http://obihoernchen.net/wordpress/wp-includes/images/smilies/icon_smile.gif" alt=":-)" class="wp-smiley">

        # Enable colors for ls, etc. Prefer ~/.dir_colors
        if type -P dircolors >/dev/null ; then
                if [[ -f ~/.dir_colors ]] ; then
                        eval $(dircolors -b ~/.dir_colors)
                elif [[ -f /etc/DIR_COLORS ]] ; then
                        eval $(dircolors -b /etc/DIR_COLORS)
                fi
        fi

        # -- CUSTOM PS1 String START --

        PS1="\$? \$(if [[ \$? == 0 ]]; then echo \"\[\033[01;32m\]\342\234\223\"; else echo \"\[\033[01;31m\]\342\234\227\"; fi) $(if [[ ${EUID} == 0 ]]; then echo '\[\033[01;31m\]\h'; else echo '\[\033[01;32m\]\u@\h'; fi)\[\033[01;34m\] \w \$\[\033[00m\] "
        #PS1="\[\033[0;37m\]\342\224\214\342\224\200\$([[ \$? != 0 ]] && echo \"[\[\033[0;31m\]\342\234\227\[\033[0;37m\]]\342\224\200\")[$(if [[ ${EUID} == 0 ]]; then echo '\[\033[0;31m\]\u\[\033[0;37m\]@\[\033[0;96m\]\h'; else echo '\[\033[0;33m\]\u\[\033[0;37m\]@\[\033[0;96m\]\h'; fi)\[\033[0;37m\]]\342\224\200[\[\033[0;32m\]\w\[\033[0;37m\]]\n\[\033[0;37m\]\342\224\224\342\224\200\342\224\200\076 \[\033[0m\]"
        # --- Custom PS1 String END ---

        # Use this other PS1 string if you want \W for root and \w for all other users:
        # PS1="$(if [[ ${EUID} == 0 ]]; then echo '\[\033[01;31m\]\h\[\033[01;34m\] \W'; else echo '\[\033[01;32m\]\u@\h\[\033[01;34m\] \w'; fi) \$([[ \$? != 0 ]] && echo \"\[\033[01;31m\]:(\[\033[01;34m\] \")\$\[\033[00m\] "

        alias ls="ls --color=auto"
        alias dir="dir --color=auto"
        alias grep="grep --colour=auto"
        alias dmesg='dmesg --color'
        man() {
            env LESS_TERMCAP_mb=$'\E[01;31m' \
            LESS_TERMCAP_md=$'\E[01;38;5;74m' \
            LESS_TERMCAP_me=$'\E[0m' \
            LESS_TERMCAP_se=$'\E[0m' \
            LESS_TERMCAP_so=$'\E[38;5;246m' \
            LESS_TERMCAP_ue=$'\E[0m' \
            LESS_TERMCAP_us=$'\E[04;38;5;146m' \
            man "$@"
        }

        # Uncomment the "Color" line in /etc/pacman.conf instead of uncommenting the following line...!

        # alias pacman="pacman --color=auto"
else

        # show root@ when we do not have colors

        PS1="\u@\h \w \$([[ \$? != 0 ]] && echo \":( \")\$ "

        # Use this other PS1 string if you want \W for root and \w for all other users:
        # PS1="\u@\h $(if [[ ${EUID} == 0 ]]; then echo '\W'; else echo '\w'; fi) \$([[ \$? != 0 ]] && echo \":( \")\$ "

fi

PS2="> "
PS3="> "
PS4="+ "

# Try to keep environment pollution down, EPA loves us.
unset safe_term match_lhs

# Try to enable the auto-completion (type: "pacman -S bash-completion" to install it).
[ -r /usr/share/bash-completion/bash_completion ] && . /usr/share/bash-completion/bash_completion

# Try to enable the "Command not found" hook ("pacman -S pkgfile" to install it).
# See also: https://wiki.archlinux.org/index.php/Bash#The_.22command_not_found.22_hook
[ -r /usr/share/doc/pkgfile/command-not-found.bash ] && . /usr/share/doc/pkgfile/command-not-found.bash
More information and other examples: https://wiki.archlinux.org/index.php/Color_Bash_Prompt
To search for available packages in repos if your command doesn’t exist on your current system configuration install pkgfile
pacman -Sy pkgfile
pkgfile --update
14. Disable some logging to extend USB stick lifetime
Flash drives have limited number of write cycles and default linux logging will write pretty much so your USB will be destroyed pretty fast.
That’s why a swap file on your USB stick is a really bad idea!
But you can disable some logging to extend the liefetime of your USB stick.
Just edit syslog-ng.conf and disable some of the “log { source(src); filter…” lines at the end of the file.
You can comment out (add a “#” in front of the line) all lines if you want to disable everything.
nano /etc/syslog-ng/syslog-ng.conf
I’ve disabled some of them. That’s my example:
# Disable some logging
#log { source(src); filter(f_acpid); destination(d_acpid); };
log { source(src); filter(f_authpriv); destination(d_authlog); };
#log { source(src); filter(f_syslog); destination(d_syslog); };
#log { source(src); filter(f_cron); destination(d_cron); };
#log { source(src); filter(f_daemon); destination(d_daemon); };
#log { source(src); filter(f_kernel); destination(d_kernel); };
#log { source(src); filter(f_lpr); destination(d_lpr); };
#log { source(src); filter(f_mail); destination(d_mail); };
#log { source(src); filter(f_news); destination(d_news); };
#log { source(src); filter(f_ppp); destination(d_ppp); };
log { source(src); filter(f_user); destination(d_user); };
#log { source(src); filter(f_uucp); destination(d_uucp); };
#log { source(src); filter(f_debug); destination(d_debug); };
#log { source(src); filter(f_messages); destination(d_messages); };
log { source(src); filter(f_err); destination(d_errors); };
log { source(src); filter(f_emergency); destination(d_console); };
#log { source(src); filter(f_everything); destination(d_everything); };
#log { source(src); filter(f_iptables); destination(d_iptables); };
On top of that you could disable logging of some servers like samba, minidlna and so on.
I don’t do that because I want to have these logs but to do so set the log path in the config files to /dev/null
Great post, thank you for this.
Any plans to write 14. Disable some logging to extend USB stick lifetime ?
Yes will write it today. And I’ll publish a Samba4 guide as well 🙂
Writing is finished just some more fine tuning 😀
14.) is finished.
obi,
I was wondering in Webmin it doesn’t show Samba in the Server section. I need to do a search for Samba page to show up. Any suggestions?
Yes I had the same issue sometimes. After some time it was fixed xD Webmin seems to be a little bit buggy.
I don’t use webmin anymore because it doesn’t have much benefits for me and consumes pretty much ressources…
i tried
cp -a /tmp/sda1/* /tmp/sdb1/
to copie everything on a second usb stick but get some file errors while copying.
trying to boot from the second usb-stick didnt work.
someone got similar results?
Can you add a way to backup the USB drive? In case the one being used on the pogoplug gets corrupted, I can just reformat and slap on a new one?
Just copy the whole USB stick to your external HDD with “cp”.
There’s a nice Windows programme by the name of USB Image Tool that lets you back up and restore USB sticks with one click. See http://www.alexpage.de/
Obi,
I had NTFS installed and mounted on my Pogo but I had two issues. One was getting automount of the drive when the device is plugged in. It wouldn’t boot with my NTFS drive plugged in at the same time with ArchLinux USB stick in. I saw that udevil command and will try that later. So you can have all your drives plugged into the Pogo and then plug power cord last and it will all load up correctly?
Also when I had NTFS working the problem I had was that I tried to transfer my movies that range from 4-12GB in size. It was coming from my PC to transfer onto the Pogo and it would only let me transfer one file at a time. The other files would fail and create a folder with that name in the Arch NTFS external drive which would then later cause Windows to come up with a window asking if we want to replace, keep both files, etc. Does your method solve that?
1) mhh yes try to use udevil it should work fine.
2) yes this seems to be a known problem :/ Nobody found a way to fix this 🙁 It seems to be a NTFS problem…
Hi, i have everything installed (webmin, samba, apache, mediatomb, udevil) on an 8GB USB Stick and it works fine.
There is one major Problem. If i put an externel USB Harddrive in a second USB-Port it will show automatically in /media/hdd_name. But if i reboot it wont boot correctly and i cannot connect via ssh.
I Dont know how to solve this problem. If i put the hdd out everything boots up fine from usb stick.
The hdd is NTFS and there is no Boot-things on it.
Something i can do/check?
After a while of testing i get it. I dont know exactly what the problem is. It matters where the USB-Stick and the USB-harddrive is put in. Maybe the first usb-port comes first in the boot order and so on.
Is there a possibility to told archlinux that only the usb-stick should used to boot from?
Ok now i know the Problem and found a well described solution. Maybe someone else need this hint…
http://mouhassan.wordpress.com/tag/booting/
Hi basti523,
Your post help resolved my issue with the E02 not able to boot /connect to network after reboot or power-cycle.
However it is not able to auto mount the external HDD anymore. Any not sure why all filesystem path is now read-only:
[root@alarm etc]# cd /
[root@alarm /]# ls
bin boot dev etc home lib lost+found media mnt opt proc root run sbin srv sys tmp usr var
[root@alarm /]# mkdir test
mkdir: cannot create directory âtestâ: Read-only file system
[root@alarm /]# df -k
Filesystem 1K-blocks Used Available Use% Mounted on
rootfs 1864192 648936 1120556 37% /
dev 125112 0 125112 0% /dev
run 126236 13396 112840 11% /run
/dev/sda1 1864192 648936 1120556 37% /
tmpfs 126236 0 126236 0% /dev/shm
tmpfs 126236 0 126236 0% /sys/fs/cgroup
tmpfs 126236 0 126236 0% /tmp
[root@alarm /]# touch /var/log/test.log
touch: cannot touch â/var/log/test.logâ: Read-only file system
[root@alarm /]#
any ideas on how to resolve the issue?
thanks
Hi nanao,
try
mount -o remount,rw /
for the current login session it will resolve the problem with read only file system, but only until next reboot.
When you use “mount” you should see that /dev/root is mounted on / with rw, …i think your partition has ro there.
[root@alarm ~]# mount
/dev/root on / type ext2 (rw,relatime,errors=continue)
Ok, to two things worth a try:
1.
fw_setenv usb_init “run usb_scan; setenv usb_root LABEL=ROOTFS rw”
2.
edit /etc/fstab and add (please take care inserting the right device) :
/dev/sda1 / ext3 defaults,noatime,rw 0 1
Better inserting with the Label:
LABEL=ROOTFS / ext3 defaults,noatime,rw 0 1
good luck!
i tried
cp -a /tmp/sda1/* /tmp/sdb1/
to copie everything on a second usb stick but get some file errors while copying.
trying to boot from the second usb-stick didnt work.
someone got similar results?
There’s a crucial line missing (IMHO) from the install instructions:
/usr/sbin/fw_setenv usb_rootfstype ‘ext3’
Hi, I tried you big writes mechanism and it is not working. When I try to copy a large file across I get no where the speed stated and also the transfer breaks in between telling there was a network error. I am using a HDD formatted as an NTFS drive.
Any help will be greatly appreciated.
Thanks !!!
Does it work locally? Try to copy some big files to your Hdd locally or try to bench with dd ans see whether this works fine.
There’s a major issue were lots of people are having problems after reboot. Perhaps the instructions should be updated to format the drive into ext3 rather than ext2?
http://archlinuxarm.org/forum/viewtopic.php?f=18&t=5028&p=29010#p29010
hey! awesome guide, I’m fairly newbie and was up and running in minutes! if you are going to continue (PLEASE PLEASE PLEASE 🙂 ) it would be great to do so in the webmin tradition – I can follow what you do on the command line, but feel on my own if I want to do any changes. Prioritize if you can programs with web based GUI.
Some suggestions (what I want to set up myself):
-FTP/samba, esp. how to do it with different usb drives attached.
-transmission or other torrents
Thanks!!
PS: My only problem is, that I currently can’t reboot with additional drives attached (in addition to the ArchLinux flash drive). Is it possible to “hard code” which device should be choosen as boot device?
Obi, thanks for the great guide.
I was able to setup my Pogo and do all configurations with very little Linux knowledge.
I event set up SAMBA with a protected and a shared folder – works great too with all devices in local lan.
I will continue with external access (DynDNS, OpenVPN & Owncloud) and would be interested if you continue in the same direction?
Yes I’ll do so. I’m going to finish my exams next week then I’ll write some new guides 🙂
Good luck for your exams. I look forward reading more guides from you!
How did your exams go?
I just got archlinux up and running on my plug and I am excited to see your guide for owncloud. 🙂
with a USB Stick and a sleeping external Hard Disk it consumes 6 W ;-). And At night i dont need the whole thing, but i can do this by time switch.
@Obi
Hi,
is it possible to use a suspend or hibernate command to the pogoplug? i tried “systemctl suspend” but get an error message (A dependency job for suspend.target failed. See ‘journalctl -xn’ for details.)
Maybe the pogoplug cant set to a sleep mode?
greetz Basti
hmm sleep would be pretty useless woudn’t it?
Why do you want set pogoplug to sleep?
It consumes about 3W 😉
On top of that I think it isn’t implemented.
update: so I have power off and removed the usb drive where archlinux is installled.
Then take it to another linux machine re-install ArchLinuxARM-armv5te-latest.tar.gz onto the usb drive.
Then insert usb drive back to pogo-e02, it was able to boot and get ip and I can ssh into it.
Now I set static ip, systemctl restart netcfg, can ssh to static ip okay. (not running update), but still after reboot or power cycle then pogo-e02 failed to boot up to ready, cannot ssh to it any more, ping no reply.
P.S. This pogo-e02 is new, I just purchased recently (does not have the extra 2nd flash drive built-in.
Any ideas what is wrong or any suggestions?
I have already tried with 2 different usb drive vendor and size.
OK that’s strange.
So even a fresh installation doesn’t work :O
Please try to install everything from stock again. Update. Reboot. Just to be sure.
If it fails again. Attach your USB stick to another linux machine (or windows with some ext2 driver) and get the logs. Kernel logs and so on.
It’s pretty strange :/
Hi Obi,
I have tried fresh re-install several times today and similar problem each time after few shutdown, device would not connect to network. I have tried to set static ip, it works for awhile, but again, after few shutdown, same issue: doesn’t connect to network.
Also, 1 more question, while it was able to connect to network, miniDLNA was not visible by Android BubbleUpnp or Samsung AllShare, but only seen by Windows media player. Any ideas for this issue?
Only thing I found interesting was in message.log (see below); I didn’t see any error in kernel.log file
Dec 31 18:00:22 alarm dhcpcd[219]: eth0: sending IPv6 Router Solicitation
Dec 31 18:00:26 alarm dhcpcd[219]: eth0: sending IPv6 Router Solicitation
Dec 31 18:00:28 alarm netcfg-daemon[124]: :: wired-eth0 up DHCP IP lease attempt failed.
Dec 31 18:00:28 alarm netcfg-daemon[124]: [fail]
Dec 31 18:00:28 alarm systemd[1]: netcfg.service: main process exited, code=exited, status=1/FAILURE
Dec 31 18:00:28 alarm systemd[1]: Unit netcfg.service entered failed state
Dec 31 18:00:28 alarm systemd[1]: Starting Network.
Dec 31 18:00:28 alarm systemd[1]: Reached target Network.
Dec 31 18:00:28 alarm systemd[1]: Starting minidlna server…
Dec 31 18:00:28 alarm systemd[1]: Starting OpenNTP Daemon…
Dec 31 18:00:29 alarm minidlna[314]: [1969/12/31 18:00:29] minidlna.c:754: fatal: No IP address automatically detected!
Dec 31 18:00:29 alarm systemd[1]: minidlna.service: control process exited, code=exited status=255
Dec 31 18:00:29 alarm systemd[1]: Unit minidlna.service entered failed state
Dec 31 18:00:43 alarm systemd[1]: Started OpenNTP Daemon.
Dec 31 18:00:43 alarm systemd[1]: Starting Multi-User.
Dec 31 18:00:43 alarm systemd[1]: Reached target Multi-User.
Dec 31 18:00:43 alarm systemd[1]: Starting Graphical Interface.
Dec 31 18:00:43 alarm systemd[1]: Reached target Graphical Interface.
Dec 31 18:00:43 alarm systemd[1]: Starting Update UTMP about System Runlevel Changes…
Dec 31 18:00:43 alarm systemd[1]: Started Update UTMP about System Runlevel Changes.
Dec 31 18:00:43 alarm systemd[1]: Startup finished in 12s 48ms 782us (kernel) + 31s 861ms 549us (userspace) = 43s 910ms 331us.
P.S. I have entire log folder if you want me to zip it up and email it.
set minidlna port to 4000 will allow Android BubbleUpnp and Samsung AllShare to see it (had a similar issue in mediamonkey and that port works).
boot issue after powercycle, see basti523 post below.
How do I set sub netmask and broadcast value in archlinux? Many web reference point to /etc/rc.conf your sample is not using that file.
Strange, at my home network, setting static ip, I can not connect to it. From work network I just set ip, gateway and dns and was able to connect okay (ip there was classB 172.30.2.x 255.255.255.0)
Home network is classC, ip range is 192.168.1.2-192.168.1.253
gateway is 192.168.1.254 and dns is 192.168.1.254.
I have tried setting below in /etc/network.d/wired-static-eth0, with and without Broadcast value, but cannot connect.
Wireshark SSDP traffic from pogo-e02 source ip is 192.168.1.50 but Destination as 239.255.255.250. Should this value be 255.255.255.0?
INTERFACE=’eth0′
IP=’static’
ADDR=’192.168.1.50′
#ROUTES=(‘192.168.0.0/24 via 192.168.1.2′)
BROADCAST=’192.168.1.255′
GATEWAY=’192.168.1.254’
DNS=(‘192.168.1.254’)
Hi Obi,
Thanks for putting together this great guide! Very complete and detailed. Need your help, I followed your guide on my pogo-e02, today, things went well until after update, set hostname and timezone then reboot in steps 3. & 4. from above, the popo-e02 is no longer connected to the network, have waited 15+ minutes.
Have tried unplug power, re-connect power to pogo-e02 and capture Wireshark from hub also shows no DHCP request. Any suggestion to get it up and running? Something in latest update breaking something?
P.S. I don’t have RS232 connection to pogo-e02.
Thanks
@OBI, did you ever tried RYGEL?! I can’t find any tutorial about it!?
No.. never heared about it 😀
So there are 4 different UPnP / DLNA server:
– MiniDLNA
– MediaTomb
– uShare
– Rygel
I use MiniDLNA because it’s the most lightweight implementation.
But I really have to test the other 3 as well 😀
I tried minidlna, mediatomb and plex.
minidlna -> fast, easy configuration, no external link supporting
mediatomb -> medium fast, web interface with external link support (you can paste straming links and watch them on tv without downloading the whole file! internet radio and so on.), configuration for transcoding is confusing, no systemd support!? after an systemupdate i cant use mediatomb any longer and i had to get back to an old system backup.
plex -> slow webinterface, not stable on my pogo (after 3 days working it is not reachable over network, but process is running), i dont know how to autostart it,
i used the plex tutorial from above
there is a newer version available:
http://plexrpms.markwalker.dk/arm/
installation process is the same as in the tutorial from barbin. the new version supports channels. i can install channels but none is working 🙁
Rudi – Thanks for the Samba write-up. No problems getting it up and running. I’ve given up on miniDLNA as I was able to get Plex media server installed instead with no issues.
You’re welcome…Do you have a link for the tutorial to install the Plex Media Server so it is also running as DLNA Server?!
BR
Rudi
Here’s a link to setting up Plex Media server on a Plug:
Yes…. i’ve added it to the conf file..
/etc/sysctl.conf
# Increase inotify max watchs per user for local minidlna
fs.inotify.max_user_watches = 100000
Roundabout 30000 Files, i’ve checked the minidlna log file and it is really big, there is sometimes the error message:
[Permission denied]
[2013/02/19 13:44:57] inotify.c:90: error: inotify_add_watch
Could this be the error?!
Yes that’s the error.
Did you increase your inotify user watches?
sysctl fs.inotify.max_user_watches=100000Hi Obi, one question about the miniDLNA, does auto update of your music libary work with your device?!
BR
Rudi
Yes it works fine.
But you have to wait 900s after full file copy (notify_interval=900).
How many files do you have?
Maybe check permissions of your db dir?
Do you have some minidlna logs?
1. Install SAMBA:
pacman -S samba
2. Copy smb.conf:
cp /etc/samba/smb.conf.default /etc/samba/smb.conf
3. Edit Config File
nano /etc/samba/smb.conf
4. Copy/Owerwrite/Modify Config file with this:
[global]
workgroup = Enter your Windows WORKGROUP #Win7 Standard = WORKGROUP)
server string = ENTER Description (eg. Rudi Samba Server)
netbios name = ENTER NAME (eg. RUDISAMBA)
name resolve order = bcast host
disable netbios = no
security = user
null passwords = yes
map to guest = bad user
log file = /var/log/samba/%m.log
max log size = 50
dns proxy = no
socket options = TCP_NODELAY IPTOS_LOWDELAY SO_KEEPALIVE SO_RCVBUF=131072 SO_SNDBUF=131072 SO_KEEPALIVE
use sendfile = yes
min receivefile size = 16384
write cache size = 1097152
read raw = yes
write raw = yes
load printers = no
printing = bsd
printcap name = /dev/null
disable spools = yes
strict allocate = yes
[HD1]
printable = no
writable = yes
path = ENTER YOUR External HD STORAGE PATH (eg. /media/Rudi500GB)
guest ok = yes
create mask = 0777
comment = HD1
public = yes
5. Autostart / Restart Samba
systemctl enable smbd
systemctl enable nmbd
systemctl restart smbd
systemctl restart nmbd
path = ENTER YOUR External HD STORAGE PATH (eg. /media/Rudi500GB)
i’m missing something here. i can’t CD to that path to see what my drive is called. how do i find the drive pathname to use here?
cd /media and ls you should see your HDD there. (Udeliv have be set up)
you mean ‘udevil’ got that setup and working. but now when i try and access the samba share from win7 its asking for a user/pass. root and my password don’t work.
can you give a little direction on how to fix that?
You can set samba mode to share and allow guest access. Then you will be able to access your hdd without login
Hi. Uh, I’m not sure what you mean by “disable everything”. Here are the active (uncommented) lines from my conf file. The ‘network_interface line was initially commented. I removed the comment but it seemed to have no effect on my issue. Thanks.
port=8200
network_interface=eth0
media_dir=V,/media
friendly_name=POGOPLUG DLNA Server
log_dir=/var/log
log_level=general=warn,artwork,database,inotify,scanner,metadata,http=warn,ssdp=warn,tivo=warn
album_art_names=Cover.jpg/cover.jpg/AlbumArtSmall.jpg/albumartsmall.jpg/AlbumArt.jpg/albumart.j$
inotify=yes
enable_tivo=no
Mhh. looks fine.
I mean disable everything which could block network traffic. TCP Wrappers, IP Tables and so on.
Or check your router/switch configuration? Maybe disabled UPnP is a problem but it shouldn’t…
Obi- Great write-up! I’m a newbie and was able to get just about everything working except the miniDLNA. I get a “connection refused” error when I try to connect to my Pogo (using Plex on a Roku).
nmap shows these ports as open:
PORT STATE SERVICE
22/tcp open ssh
80/tcp open http
8200/tcp open trivnet1
10000/tcp open snet-sensor-mgmt
while lsof shows:
minidlna 21382 nobody 5u IPv4 69633 0t0 UDP *:ssdp
minidlna 21382 nobody 6u IPv4 69634 0t0 TCP *:trivnet1 (LISTEN)
minidlna 21382 nobody 7u IPv4 69635 0t0 UDP 192.168.1.80:33091
I’m guessing the problem is that 1900/udp is not open?? Have you encountered this? Any ideas? (I don’t have iptables enabled.)
If this is too off topic, no problem. Thanks!
hmm not sure…
Maybe try to disable everything and see whether this solves the problem.
Could you post your minidlna.conf ?
Thanks Obi! Just got miniDLNA working. Works like a charm!
Also, another idea would be for a swap file creation placed on an external hard drive. I think either SABNZBD or Sickbeard require it.
yep planned 🙂
Hey Obi, you’re great, Thx for that!
Now only SAMBA is missing 😉 and then this is the reference site for everyone with a Pogoplug!
THX and have a good night!
BR
Samba is finished now 🙂 – http://obihoernchen.net/wordpress/877/setup-samba-4-on-arch-linux/
Best ARM Linux Guide for Pogoplug, works perfect! Thx for that, could you please provide some useful guide for the minidlna server?! THX and BR Rudi
Found time to add MiniDLNA hope you like it 🙂
I love the guide. It really helps out a new user. I see you plan on adding the Samba and minidlna sections. Would you also consider adding in SABNZBD and Sickbeard? It would be great to have everything in one place. Thanks!
Thanks 🙂 Yes will add everything ASAP. Right now I have to deal with a lot of other stuff :/
Sounds good. I will check back frequently for the updates! Thanks again!
Found time to add MiniDLNA hope you like it 🙂
Small Problem at ffmpegthumbs
execute doesnßt work:
Answer is:
-bash: /usr/local/bin/generateThumbs.sh: Permission denied
Can you help me?
Ahhhh shit forgot to add chmod. Set it to 755 and it should work 🙂 chmod u+x thumbnail…
chmod u+x /usr/local/bin/generateThumbs.sh
You don’t need NTFS in order to share your data with Samba, ext3/ext4 should do fine. Samba doesn’t provides direct access to the file system, it’s not iSCSI. 😉
Yes of course. But if you want to use the HDD somewhere else as well :/
Good point!
Thanks for this guide by the way. It is far and away the best guide I’ve found.