Preface
Nearly 3 years ago I have bought myself a PogoplugV2 (see Post). It is still an awesome device for this price and worked without any issue the whole time.
However it is time for an upgrade. USB 2.0 was a little bit too slow for me (~30MB/s). In addition I have a lot of external USB 3.0 HDDs and it is time to use their full potential. So there are 4 key points a device needs to become my next NAS (Network-attached storage) and home server system:
- reasonable fast ARM processor with at least 2 cores (I prefer ARM over x86 for this use case because of its low energy consumption)
- Gigabit ethernet
- at least 2 USB 3.0 ports because I want to attach 2 active 4-port USB hubs. Almost all USB hubs >4 ports are cascaded 4 port hubs. This is quite bad because it can cause a lot of compatibility and of course performance issues.
- all together <150€. I do not want to pay 300-400€ for a simple NAS with USB disks…
ODROID-XU4
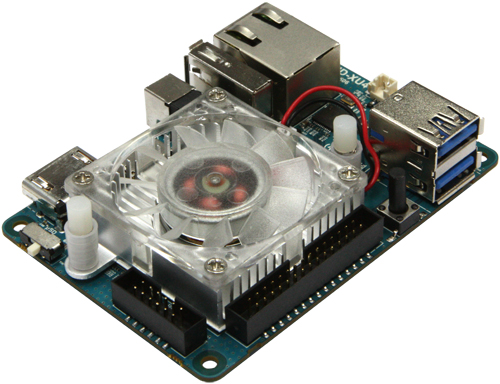
After a bit of research I have bought an ODROID-XU4.
Let’s look at the specs:
 Samsung Exynos5422 Cortex™-A15 2Ghz and Cortex™-A7 Octa core CPUs
- Mali-T628 MP6(OpenGL ES 3.0/2.0/1.1 and OpenCL 1.1 Full profile)
- 2Gbyte LPDDR3 RAM PoP stacked
- eMMC5.0 HS400 Flash Storage
- 2 x USB 3.0 Host, 1 x USB 2.0 Host
- Gigabit Ethernet port
- HDMI 1.4a for display
- Size : 82 x 58 x 22 mm
- Price: ~80 € + PSU ~8 € + Case ~8€ = ~96 €

I do not need the GPU and display output but whatever… the price is quite good for this performance. It is less expensive in US than it is in germany. But that is always the case 😉
Additional equipment
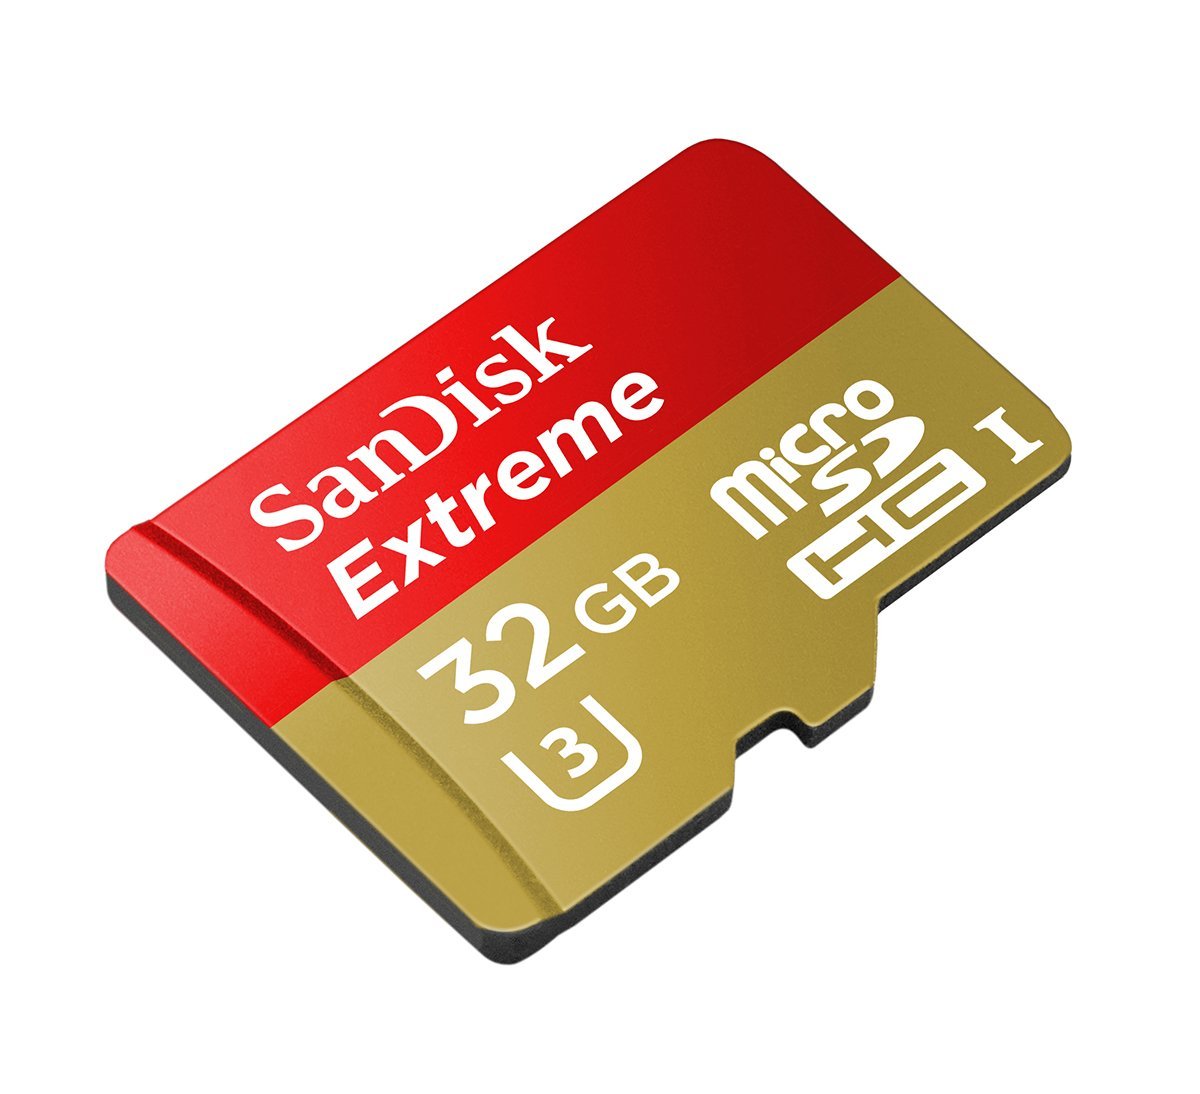
I am using a microSD Card for OS because eMMC is quite expensive. Boot times and program loading times are not that important my use case.
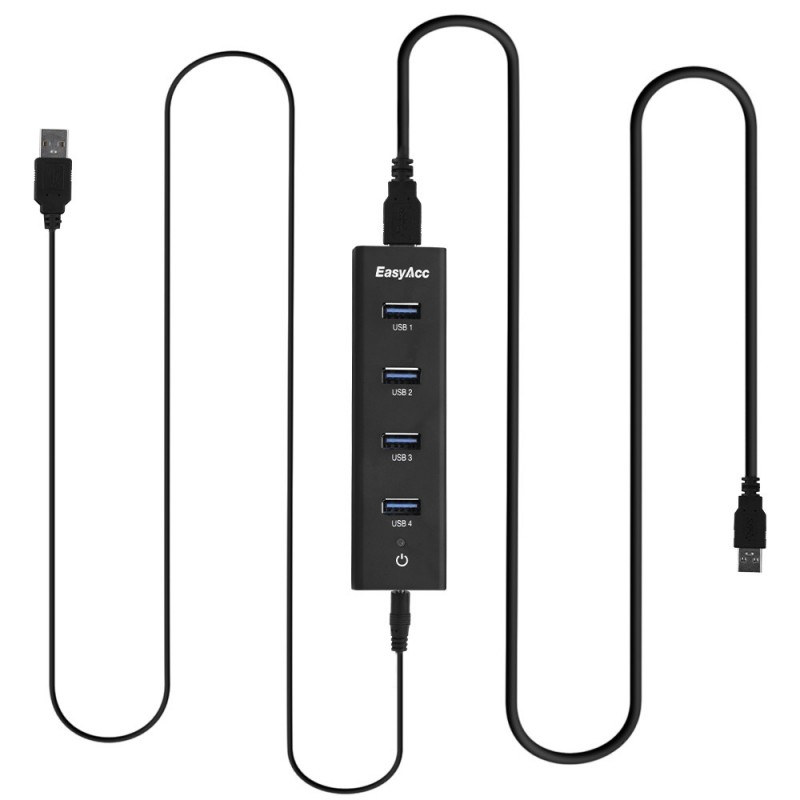
With two additional 4 port active USB 3.0 hubs I have 8 USB 3.0 ports and 1 USB 2.0 port. At the moment 5 disks are connected with a total of 7.5 TB storage.
Connecting a 2 TB disk to each USB 3.0 port would be 16 TB storage which should be good enough for some time.
- SanDisk Extreme 32GB microSDHC UHS-I ~20 €
- 2x EasyAcc® Superspeed USB 3.0 4 Port Bus-Powered and Self-Powered 2-in-1 Hub 2x ~11 €
- Anker 20W Dual-Port USB Wall Charger to power USB Hubs ~10 €

OS Choices
The ODROID-XU4 SOC is the same as its predecessor ODROID-XU3. That is why they share a common kernel and os images are compatible.
Nevertheless Exynos5422 SOC is not fully integrated in mainline kernel yet. That is why you have to use a custom kernel from hardkernel. But that is not a big issue because there a quite a few OS choices with the custom kernel like Android (ofc pretty useless for NAS), Ubuntu 15.04, Arch Linux, Fedora, Kali Linux, …
Also I really like Arch Linux I have chosen a different path this time. There is OpenMediaVault (OMV) for some Odroids. I thought hey let’s give it a try the web interface looks quite nice.
After a few days I can say I really like it. The web interface is really good and looks modern.
OMV is running on Debian Wheezy 7.9.
Installation
Download OpenMediaVault Image from: http://sourceforge.net/projects/openmediavault/files/Odroid-XU3_XU4/
Extract the downloaded image
gunzip -d omv_2.1.1_xu3_xu4.img.gz
Search for the path of your microSD Card with lsblk or sudo fdisk -l
Write the image to your microSD card with the following commands:
sudo dd if=omv_2.1.1_xu3_xu4.img of=/dev/<Your_SD> bs=4096
sync
Insert your microSD card and power your Odroid.
Then you can login via SSH or web interface:
SSH
username: root
password: odroid
Web interface
username: admin
password: openmediavault
I will not go into detail on how to configure stuff in the web interface because that is really easy and straightforward. I will focus on optimizing performance and adding a few neat features.
Basic configuration
Connect to your Odroid via SSH with default login credentials (see above).
Afterwards change your root password with passwd
You should change your web interface password, too.
Colorful Shell
Because we will use the shell for quite some time let’s add some color to it:
vi ~/.bashrc and comment out the following lines:
# You may uncomment the following lines if you want `ls' to be colorized:
export LS_OPTIONS='--color=auto'
eval "`dircolors`"
alias ls='ls $LS_OPTIONS'
alias ll='ls $LS_OPTIONS -l'
alias l='ls $LS_OPTIONS -lA'
vi /etc/vim/vimrc and comment out the following line:
syntax on
and some more set’s from the bottom of the file as you like.
Note: If you are not familiar with vi/vim you can use nano to edit all files.
Performance tuning
Performance with default settings was really bad. Disk read and write was around 30MB/s to ext4 and SSH was laggy. After a few minutes I have found the issue. Per default OMV sets the conservative governor. This may work well with x86 CPUs or other ARM CPUs but with Odroid it is a pain.
In the web interface under “Power Management” is an option called “Monitoring – Specifies whether to monitor the system status and select the most appropriate CPU level.” This sounds quite good, problem is this option sets the cpu governor to conservative. Conservative governor with default settings works really bad on Odroid in combination with I/O.
Disabling this option sets governor to performance. All 8 cores at max clock speed the whole time produce quite a bit of heat (fan spinning a lot) and it is not really energy efficient.
CPU governor
But no problem we can change the governor to ondemand and with a little bit tuning your Odroid will fly. The following settings will replace conservative with ondemand governor if you enable the Power Management option.
vi /etc/default/openmediavault and append the following lines to this file:
# Ondemand Scheduler
OMV_CPUFREQUTILS_GOVERNOR="ondemand"
Then regenerate the config with
omv-mkconf cpufrequtils
Note: There seems to be a bug in OpenMediaVault. After disabling Power Management and enabling it again it does not change cpu governor anymore. To fix this do the following:
update-rc.d cpufrequtils defaults
Ondemand governor tuning
I did a few benchmarks and this showed I/O performance (my main focus) depends a lot on the cpu frequency. Therefore we further have to tune ondemand governor to get full I/O throughput. To do so do the following:
apt-get install sysfsutils
vi /etc/sysfs.conf
Copy the following to this file
# cpu0 sets cpu[0-3], cpu4 sets cpu[4-7]
devices/system/cpu/cpu0/cpufreq/ondemand/io_is_busy = 1
devices/system/cpu/cpu4/cpufreq/ondemand/io_is_busy = 1
devices/system/cpu/cpu0/cpufreq/ondemand/sampling_down_factor = 10
devices/system/cpu/cpu4/cpufreq/ondemand/sampling_down_factor = 10
devices/system/cpu/cpu0/cpufreq/ondemand/up_threshold = 80
devices/system/cpu/cpu4/cpufreq/ondemand/up_threshold = 80
Afterwards change to ondemand governor and activate these values with
cpufreq-set -g ondemand -c 0
cpufreq-set -g ondemand -c 4
service sysfsutils start
I did benchmarks with all these settings and for me this is the sweet spot. Nearly same performance as performance governor but lower frequency and less power consumption when idle.
Some explanation of all 3 settings:
sampling_down_factor: this parameter controls the rate at which the kernel makes a decision on when to decrease the frequency while running at top speed. When set to 1 (the default) decisions to reevaluate load are made at the same interval regardless of current clock speed. But when set to greater than 1 (e.g. 100) it acts as a multiplier for the scheduling interval for reevaluating load when the CPU is at its top speed due to high load. This improves performance by reducing the overhead of load evaluation and helping the CPU stay at its top speed when truly busy, rather than shifting back and forth in speed. This tunable has no effect on behavior at lower speeds/lower CPU loads.
up_threshold: defines what the average CPU usage between the samplings of ‘sampling_rate’ needs to be for the kernel to make a decision on whether it should increase the frequency. For example when it is set to its default value of ’95’ it means that between the checking intervals the CPU needs to be on average more than 95% in use to then decide that the CPU frequency needs to be increased.
io_is_busy: if 1 waiting for I/O will increase the calculated cpu usage. The governor will calculate iowait as busy and not idle time. Thus cpu will reach higher frequencies faster with I/O load.
NTFS mount options
Besides the ondemand governor we will add the big_writes mount option to all NTFS mounts. In addition we will add noatime.
big_writes: this option prevents fuse from splitting write buffers into 4K chunks, enabling big write buffers to be transferred from the application in a single step (up to some system limit, generally 128K bytes).
noatime this option disables inode access time updates which can speed up file operations and prevent sleeping (notebook) disks spinning up too often thus saving energy and disk lifetime.
vi /etc/default/openmediavault and append the following
# Optimize NTFS Performance
OMV_FSTAB_MNTOPS_NTFS="defaults,nofail,noexec,noatime,big_writes"
Then you have to unmount, apply, mount, apply all your NTFS volumes in the web interface.
With default mount options you get around 16 MB/s write. With big_writes you get up to 62 MB/s write. See this comparison below:
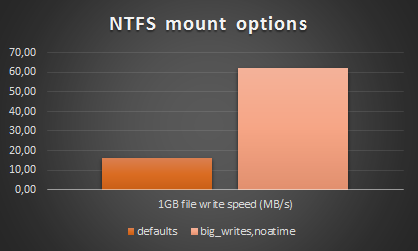
This looks fairly fast but keep in mind NTFS is very cpu intensive on such a system. Therefore real network throughput via samba (which is cpu heavy as well) is way less compared to a native linux filesystem. I tested this disk with samba and measured only ~30MB/s read and write speeds. This is considerably less than a native linux filesystem (see Samba benchmarks).
If you want to get full performance you have to use a native linux filesystem like ext4 or xfs. You really should!
More Monitoring
I really like the monitoring setup of OMV with rrdtool. Nevertheless I miss 2 graphs which I am interested in. It would be nice to have CPU frequency and CPU temperature graphs, therefore I extended the existing monitoring plugin.
Monitoring cpu frequency is no big deal because there is a native collectd plugin for CPU frequency. For CPU temperature we have to write our own collectd plugin which looks like this:
#!/bin/sh

# Read CPU temperature of ODROID-XU3/4
# There are 2 sensors available:
# /sys/devices/virtual/thermal/thermal_zone0/temp
# /sys/devices/10060000.tmu/temp

HOSTNAME="${COLLECTD_HOSTNAME:-localhost}"
INTERVAL="${COLLECTD_INTERVAL:-60}"

while sleep "$INTERVAL"; do
	VALUE="$(($(cat /sys/devices/virtual/thermal/thermal_zone0/temp)/1000))"
	if [ $? -ne 0 ]; then
		VALUE="U"
	fi
	echo "PUTVAL \"$HOSTNAME/temperature/temperature-cpu\" interval=$INTERVAL N:$VALUE"
done
In addition to the script above you have to create new collectd configs and additional tabs in the web interface. I have done all that and uploaded the full sourcecode (including the script above) to GitHub: https://github.com/Obihoernchen/openmediavault-monitoring-odroid-xu4
Install these CPU frequency and temperature monitoring plugins with the following commands:
cd /tmp
wget https://github.com/Obihoernchen/openmediavault-monitoring-odroid-xu4/archive/master.zip
unzip master.zip
cd openmediavault-monitoring-odroid-xu4-master
cp -R usr/* /usr
cp -R var/* /var
rm -r /tmp/openmediavault-monitoring-odroid-xu4-master

chmod +x /usr/local/bin/cputemp /usr/share/openmediavault/mkconf/collectd.d/cpu{freq,temp}
omv-mkconf collectd

chown openmediavault:openmediavault /var/www/openmediavault/js/omv/module/admin/diagnostic/system/plugin/Cpu{Temperature,Frequency}.js
chmod 644 /var/www/openmediavault/js/omv/module/admin/diagnostic/system/plugin/Cpu{Temperature,Frequency}.js

source /usr/share/openmediavault/scripts/helper-functions && omv_purge_internal_cache
The default diagrams are a little small for my taste, that is why I have increased the size a bit:
vi /etc/default/openmediavault and add the following to this file
# RRDTool graph width and height
OMV_COLLECTD_RRDTOOL_GRAPH_WIDTH=800
OMV_COLLECTD_RRDTOOL_GRAPH_HEIGHT=200
Afterwards update OMV’s config files with
omv-mkconf collectd
omv-mkconf rrdcached
Afterwards you will have 2 new tabs which show graphs like these:
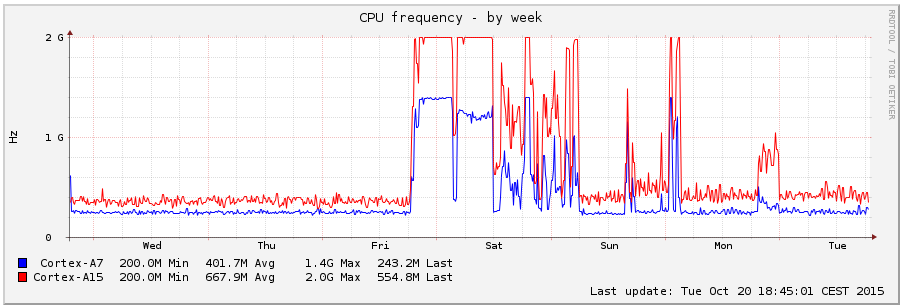
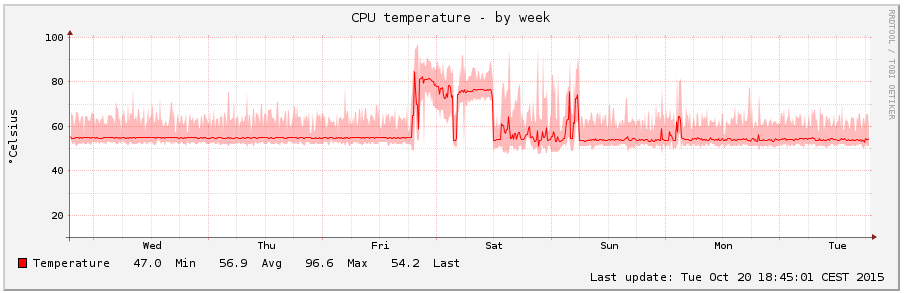
Finally reboot to see if everything is working as expected.
Benchmarks
All benchmarks were done with performance governor to get consistent results.
Disks
I have several USB disks connected to my Odroid. Expect one disk all are 2.5″ USB 3.0 disks. All USB 3.0 disks are connected to two active USB 3.0 hubs. The USB 2.0 disk is connected to the USB 2.0 port.
In the following you can find hdparm read and dd read/write benchmarks for all connected disks. As you can see the performance is quite good and should be near the maximum the disks can handle.
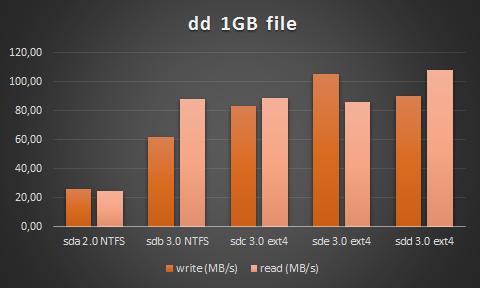
### Overview of HDDs ###
sda	USB 2.0		NTFS w big_writes	WD Elements 2,5" - 500GB
sdb	USB 3.0		NTFS w big_writes	Toshiba Canvio Basics - 2TB
sdc	USB 3.0		ext4			WD Elements 2,5" - 2TB
sdd	USB 3.0		ext4			Toshiba Stor.E Basics - 2TB
sde	USB 3.0		ext4			CnMemory Zinc 2,5" - 1TB


### hdparm results ###
hdparm -Tt /dev/sda
/dev/sda:
 Timing cached reads:   1846 MB in  2.00 seconds = 924.41 MB/sec
 Timing buffered disk reads:  74 MB in  3.06 seconds =  24.22 MB/sec

hdparm -Tt /dev/sdb
/dev/sdb:
 Timing cached reads:   1370 MB in  2.00 seconds = 685.57 MB/sec
 Timing buffered disk reads: 240 MB in  3.52 seconds =  68.26 MB/sec

hdparm -Tt /dev/sdc
/dev/sdc:
 Timing cached reads:   1898 MB in  2.00 seconds = 950.68 MB/sec
 Timing buffered disk reads: 306 MB in  3.01 seconds = 101.61 MB/sec

hdparm -Tt /dev/sdd
/dev/sdd:
 Timing cached reads:   1960 MB in  2.00 seconds = 981.68 MB/sec
 Timing buffered disk reads: 248 MB in  3.01 seconds =  82.50 MB/sec

hdparm -Tt /dev/sde

/dev/sde:
 Timing cached reads:   2024 MB in  2.00 seconds = 1013.57 MB/sec
 Timing buffered disk reads: 318 MB in  3.02 seconds = 105.41 MB/sec


### dd results ###

# sda
dd if=/dev/zero of=tempfile bs=1M count=1024 conv=fdatasync,notrunc
1024+0 records in
1024+0 records out
1073741824 bytes (1.1 GB) copied, 41.4705 s, 25.9 MB/s

echo 3 > /proc/sys/vm/drop_caches && dd if=tempfile of=/dev/null bs=1M count=1024
1024+0 records in
1024+0 records out
1073741824 bytes (1.1 GB) copied, 44.1483 s, 24.3 MB/s

# sdb
dd if=/dev/zero of=tempfile bs=1M count=1024 conv=fdatasync,notrunc
1024+0 records in
1024+0 records out
1073741824 bytes (1.1 GB) copied, 17.609 s, 61.0 MB/s

echo 3 > /proc/sys/vm/drop_caches && dd if=tempfile of=/dev/null bs=1M count=1024
1024+0 records in
1024+0 records out
1073741824 bytes (1.1 GB) copied, 12.2101 s, 87.9 MB/s

# sdc
dd if=/dev/zero of=tempfile bs=1M count=1024 conv=fdatasync,notrunc
1024+0 records in
1024+0 records out
1073741824 bytes (1.1 GB) copied, 12.9431 s, 83.0 MB/s

echo 3 > /proc/sys/vm/drop_caches && dd if=tempfile of=/dev/null bs=1M count=1024
1024+0 records in
1024+0 records out
1073741824 bytes (1.1 GB) copied, 12.1161 s, 88.6 MB/s

# sdd
dd if=/dev/zero of=tempfile bs=1M count=1024 conv=fdatasync,notrunc
1024+0 records in
1024+0 records out
1073741824 bytes (1.1 GB) copied, 10.2158 s, 105 MB/s

echo 3 > /proc/sys/vm/drop_caches && dd if=tempfile of=/dev/null bs=1M count=1024
1024+0 records in
1024+0 records out
1073741824 bytes (1.1 GB) copied, 12.531 s, 85.7 MB/s

# sde
dd if=/dev/zero of=tempfile bs=1M count=1024 conv=fdatasync,notrunc
1024+0 records in
1024+0 records out
1073741824 bytes (1.1 GB) copied, 11.9007 s, 90.2 MB/s

echo 3 > /proc/sys/vm/drop_caches && dd if=tempfile of=/dev/null bs=1M count=1024
1024+0 records in
1024+0 records out
1073741824 bytes (1.1 GB) copied, 9.95148 s, 108 MB/s
Network
All network settings are default OMV/debian settings.
Receive: 832 Mbit/s = 104 MByte/s
Send: 896 Mbit/s = 112 MByte/s
I am satisfied with these results as it is close to the theoretical maximum of 1Gbit/s.
# Server on Odroid
iperf -s -N

# Client on Thinkpad T430
# bidirectional test individually
iperf -c 192.168.0.2 -i 2 -r
------------------------------------------------------------
Server listening on TCP port 5001
TCP window size: 85.3 KByte (default)
------------------------------------------------------------
------------------------------------------------------------
Client connecting to 192.168.0.2, TCP port 5001
TCP window size:  323 KByte (default)
------------------------------------------------------------
[  5] local 192.168.0.118 port 56182 connected with 192.168.0.2 port 5001
[ ID] Interval       Transfer     Bandwidth
[  5]  0.0- 2.0 sec   200 MBytes   838 Mbits/sec
[  5]  2.0- 4.0 sec   198 MBytes   831 Mbits/sec
[  5]  4.0- 6.0 sec   198 MBytes   829 Mbits/sec
[  5]  6.0- 8.0 sec   198 MBytes   831 Mbits/sec
[  5]  8.0-10.0 sec   200 MBytes   838 Mbits/sec
[  5]  0.0-10.0 sec   994 MBytes   832 Mbits/sec
[  4] local 192.168.0.118 port 5001 connected with 192.168.0.2 port 44967
[  4]  0.0- 2.0 sec   207 MBytes   868 Mbits/sec
[  4]  2.0- 4.0 sec   215 MBytes   902 Mbits/sec
[  4]  4.0- 6.0 sec   216 MBytes   905 Mbits/sec
[  4]  6.0- 8.0 sec   214 MBytes   896 Mbits/sec
[  4]  8.0-10.0 sec   216 MBytes   907 Mbits/sec
[  4]  0.0-10.0 sec  1.04 GBytes   896 Mbits/sec


# bidirectional test simultaneously
iperf -c 192.168.0.2 -i 2 -d
------------------------------------------------------------
Server listening on TCP port 5001
TCP window size: 85.3 KByte (default)
------------------------------------------------------------
------------------------------------------------------------
Client connecting to 192.168.0.2, TCP port 5001
TCP window size:  289 KByte (default)
------------------------------------------------------------
[  5] local 192.168.0.118 port 56187 connected with 192.168.0.2 port 5001
[  4] local 192.168.0.118 port 5001 connected with 192.168.0.2 port 44808
[ ID] Interval       Transfer     Bandwidth
[  4]  0.0- 2.0 sec   125 MBytes   523 Mbits/sec
[  5]  0.0- 2.0 sec   100 MBytes   420 Mbits/sec
[  5]  2.0- 4.0 sec   109 MBytes   456 Mbits/sec
[  4]  2.0- 4.0 sec   110 MBytes   462 Mbits/sec
[  4]  4.0- 6.0 sec   112 MBytes   470 Mbits/sec
[  5]  4.0- 6.0 sec   108 MBytes   454 Mbits/sec
[  4]  6.0- 8.0 sec   118 MBytes   496 Mbits/sec
[  5]  6.0- 8.0 sec   105 MBytes   441 Mbits/sec
[  5]  8.0-10.0 sec   104 MBytes   436 Mbits/sec
[  4]  8.0-10.0 sec   119 MBytes   501 Mbits/sec
[  5]  0.0-10.0 sec   526 MBytes   441 Mbits/sec
[  4]  0.0-10.0 sec   587 MBytes   490 Mbits/sec
Samba
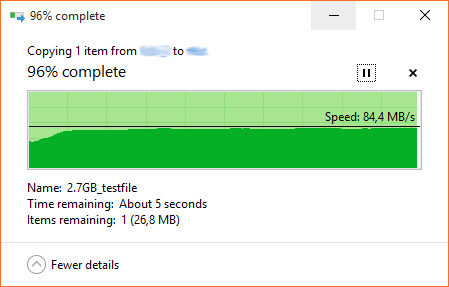
Disk and network speed looks fine. Because there are windows machines in my network I have to use samba to share files. As you can see samba speed is quite good and very stable.
Writing 2.7 GB test file to Odroid (USB 3.0 ext4 disk)
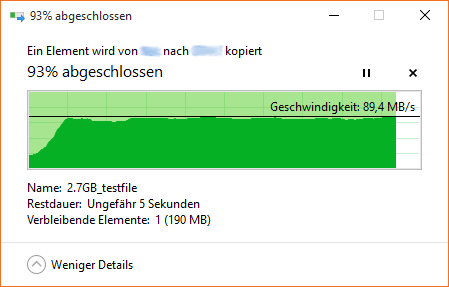
Reading 2.7 GB test file from Odroid (USB 3.0 ext4 disk)
If you have any additional questions feel free to ask 🙂
I will try to update this post regularly with new optimizations etc.
Thank you very much for this splendid blog/tutorial!
However, there’s one thing where I’m stumped. I set up a Samba/CIFS share which I can mount perfectly well on Win 7 and 10. My Dreambox refuses my attempt.
mount -t cifs -o user=***,password=*** //192.166.***.***/Media /media/fritz
yields “mounting … failed: Permission denied
Any idea as to the cause of the refusal?
Did you check the samba version? Maybe your Dreambox can’t do Samba v2 or v3. Try to check this. (should be configured in your smb.conf)
Hi,
because this site is listed very well when you search for Odroid and NAS, I want to give some important information which may help one or another.
1. Problem:
I wanted to use two 4TB HDDs (Seagate Backup Plus Portable) in a software RAID 1 (Mirror). Although everything went fine in the beginning, the RAID was not created correctly. One HDD always seemed to just go away.
Solution: The USB hub did not provide sufficient power for both HDDs. After using a second hub with enough power (KabelDirekt 4-Port USB 3.0 Hub) the RAID works fine. Now I have HDD 1 connected to one USB hub and HDD 2 connected to the other one.
2. Problem:
I could not use the update function on the Update Management page. The process of updating certain packages just did not complete. I could track down the error to apt-get no getting a connection to some servers.
Solution: Uncomment the line “precedence ::ffff:0:0/96 100” in “/etc/gai.conf” to give precedence to IPv4 over IPv6. (Found here: https://zach-adams.com/2015/01/apt-get-cant-connect-to-security-ubuntu-fix/)
Thanks, Robert
I am building a small NAS on the new Odriod HC1. I burned the OMV_3_0_88_Odroidxu4_4.9.52.img,xz image to a microSD, spent a few days tweaking the configuration, and created an image that works pretty well except for the configuration of the SSD used to host the SMB share – I configured it improperly initially, and the GUI will not let me remove that configuration and start over. The performance graphs, including the added ones for cpu frequency, all work properly.
So I started over, burning that same OMV_3_0_88_Odroidxu4_4.9.52.img.xz image to another microSD. In short, everything works except for the performance graphs: I get the “sad graph” icon for each of the different graphs under “Performance statistics”.
I have repeated the process several times, on multiple (known good) microSD cards, with identical results.
Each of the .rrd files is being created and updated properly (confirmed by manually inspecting the output of rrdtool dump.)
The directory which should contain the .png images for the various graphs (/var/lib/openmediavault/rrd) is empty.
I have compared the rrdcached journal files of two systems, one of which has working graphs and the other has only the sad graph icon. The journals are essentially identical.
Similarly, I could find no significant differences in the two syslogs.
omv-firstaid’s “Check RRD database” fails on the sad graph system, but the error message is not helpful:
Action failed — There is no service by that name
ERROR: Command ‘[‘monit’, ‘stop’, ‘rrdcached’]’ returned non-zero exit status 1
I have no python experience, so when I examined /usr/share/openmediavault/firstaid/modules.d/50fix_rrd_database.py it was not clear where these errors were coming from.
I have been hammmering on this for many hours over several days, with no luck identifying why the graphs do not work.
If you could suggest additional troubleshooting approaches, I would be most grateful.
Found the problem – it’s embarrassing – I had forgotten to enable performance stats monitoring (System > Monitoring).
Hi,
I have a similar problem. omv-firstaid’s “Check RRD database” fails with:
Checking all RRD files. Please wait …
ERROR: ‘/var/lib/rrdcached/db/localhost/rrdcached/counter-journal-rotates.rrd’ is not an RRD file
ERROR: Command ‘[‘rrdtool’, ‘last’, ‘/var/lib/rrdcached/db/localhost/rrdcached/counter-journal-rotates.rrd’]’ returned non-zero exit status 1
The only graph that is rendered is CPU Usage. Others are all “smily faces”. If I hit “Refresh” I get :
Failed to execute command ‘export PATH=/bin:/sbin:/usr/bin:/usr/sbin:/usr/local/bin:/usr/local/sbin; export LANG=C; omv-mkgraph 2>&1’ with exit code ‘1’: 2018/01/24 13:10:42 socat[3241] E connect(7, AF=1 “/var/run/rrdcached.sock”, 25): No such file or directory
with details:
Error #0:
exception ‘OMV\ExecException’ with message ‘Failed to execute command ‘export PATH=/bin:/sbin:/usr/bin:/usr/sbin:/usr/local/bin:/usr/local/sbin; export LANG=C; omv-mkgraph 2>&1’ with exit code ‘1’: 2018/01/24 13:10:42 socat[3241] E connect(7, AF=1 “/var/run/rrdcached.sock”, 25): No such file or directory’ in /usr/share/php/openmediavault/system/process.inc:175
Stack trace:
#0 /usr/share/openmediavault/engined/rpc/rrd.inc(54): OMV\System\Process->execute(Array)
#1 /usr/share/php/openmediavault/rpc/serviceabstract.inc(528): OMVRpcServiceRrd->{closure}(‘/tmp/bgstatuszN…’, ‘/tmp/bgoutputTX…’)
#2 /usr/share/openmediavault/engined/rpc/rrd.inc(56): OMV\Rpc\ServiceAbstract->execBgProc(Object(Closure))
#3 [internal function]: OMVRpcServiceRrd->generate(NULL, Array)
#4 /usr/share/php/openmediavault/rpc/serviceabstract.inc(124): call_user_func_array(Array, Array)
#5 /usr/share/php/openmediavault/rpc/rpc.inc(86): OMV\Rpc\ServiceAbstract->callMethod(‘generate’, NULL, Array)
#6 /usr/sbin/omv-engined(536): OMV\Rpc\Rpc::call(‘Rrd’, ‘generate’, NULL, Array, 1)
#7 {main}
How can I repair this issue?
Best regards, Damjan
After few reboots I have a different error now:
Error #0:
exception ‘OMV\ExecException’ with message ‘Failed to execute command ‘export PATH=/bin:/sbin:/usr/bin:/usr/sbin:/usr/local/bin:/usr/local/sbin; export LANG=C; omv-mkgraph 2>&1’ with exit code ‘1’: ERROR: unknown option ‘–slope-mode$” in /usr/share/php/openmediavault/system/process.inc:175
Stack trace:
#0 /usr/share/openmediavault/engined/rpc/rrd.inc(54): OMV\System\Process->execute(Array)
#1 /usr/share/php/openmediavault/rpc/serviceabstract.inc(528): OMVRpcServiceRrd->{closure}(‘/tmp/bgstatusnv…’, ‘/tmp/bgoutputxS…’)
#2 /usr/share/openmediavault/engined/rpc/rrd.inc(56): OMV\Rpc\ServiceAbstract->execBgProc(Object(Closure))
#3 [internal function]: OMVRpcServiceRrd->generate(NULL, Array)
#4 /usr/share/php/openmediavault/rpc/serviceabstract.inc(124): call_user_func_array(Array, Array)
#5 /usr/share/php/openmediavault/rpc/rpc.inc(86): OMV\Rpc\ServiceAbstract->callMethod(‘generate’, NULL, Array)
#6 /usr/sbin/omv-engined(536): OMV\Rpc\Rpc::call(‘Rrd’, ‘generate’, NULL, Array, 1)
#7 {main}
Any thoughts?
I found it – there’s an extra “$” at the end of one of the lines in cfpufanspeed script in collectd.d folder:
rrdtool graph \${IMGDIR}/cpufanspeed-${lcperiod}.png –start \${${ucperiod}START} \${DEFAULTS} –title “\${TITLE_CPUFANSPEED}\${${ucperiod}TITLE}” –slope-mode$
I also had to comment out “AVERAGE” values from the same script for refresh to work…
Hi Damjan,
thank you for your report! Looks like I didn’t really test the PR I got 😀
I pushed a change to the git repo. Please test the new file. I can’t test right now :/
Sorry, but not solved yet:
Failed to execute command ‘export PATH=/bin:/sbin:/usr/bin:/usr/sbin:/usr/local/bin:/usr/local/sbin; export LANG=C; omv-mkgraph 2>&1’ with exit code ‘127’: /usr/sbin/omv-mkgraph: 58: /usr/sbin/omv-mkgraph: DEF:cpufanspeed_max=/var/lib/rrdcached/db//localhost/fanspeed/fanspeed.rrd:value:MAX: not found
I just tested it and did some other changes. Works for me now.
Please update /usr/local/bin/cpufanspeed and /usr/share/openmediavault/mkconf/collectd.d/cpufanspeed
Make sure permissions are correct and then run:
source /usr/share/openmediavault/scripts/helper-functions && omv_purge_internal_cacheomv-mkconf collectd
omv-mkconf rrdcached
reboot
Hello again,
I’m not a newbie to computers, but all my experience is on the Windows side. I know almost nothing about Linux. My problem here is what little I can find on the topic I’m going to ask, people give you advice as if you already know a lot. I don’t.
The fan on my Odroid is spinning up for a couple of seconds, stopping for about five or six seconds, then repeating the process. What I really want is for the fan to be constantly spinning at a moderate speed. Can someone tell me how to make that happen? And, can someone PLEASE describe the exact steps, beginning to end, for someone who really doesn’t know linux?
#!/bin/bash
#thermal points
if [ -f /sys/devices/virtual/thermal/thermal_zone0/trip_point_0_temp ]; then
echo Set thermal trip points to 35C
echo ‘35000’ > /sys/devices/virtual/thermal/thermal_zone0/trip_point_0_temp
echo ‘50000’ > /sys/devices/virtual/thermal/thermal_zone0/trip_point_1_temp
echo ‘60000’ > /sys/devices/virtual/thermal/thermal_zone0/trip_point_2_temp
fi
if [ -f ‘/sys/devices/platform/pwm-fan:/hwmon/hwmon0/fan_speed’ ]; then
#set fan speed
echo Set fan speed
echo “80 100 150 245” > /sys/devices/platform/pwm-fan:/hwmon/hwmon0/fan_speed
fi
Hi, Obihörnchen,
I’m an OMV nooB. I just tried adding your cpufreq and cputemp graphs in OMV v3.0.88, running on an odroid HC1 (essentially, an XU4+SATA disk). All was well until I got to this step:
root@odroidhc1:/tmp/openmediavault-monitoring-odroid-xu4-master# omv-mkconf collectd
sh: 0: getcwd() failed: No such file or directory
sh: 0: getcwd() failed: No such file or directory
sh: 0: getcwd() failed: No such file or directory
sh: 0: getcwd() failed: No such file or directory
sh: 0: getcwd() failed: No such file or directory
sh: 0: getcwd() failed: No such file or directory
sh: 0: getcwd() failed: No such file or directory
sh: 0: getcwd() failed: No such file or directory
I’d appreciate any troubleshooting suggestions you may have. Thanks.
The directory you are in does not exist anymore. Just go to another directory and try again.
Thanks very much. That did the trick.
I did have to add one step to get the chown step to work:
root@odroidhc1:~# adduser openmediavault
Hmm that’s strange… Did they change the name? Maybe it’s called omv now? Can’t check right now ;/
Yes, the owner:group for all the plugins in that directory is now
openmediavault-webgui:openmediavault-webgui
The new user is called “openmediavault-webgui”.
Hi,
Im currently setting my XU4 as a NAS, having troubles with spinning my HDD up/down. With OVM out of the box HDD was spinning up and down all around – not good. Disk settings in OVM had no effect – looks it using hdparm, which is unsupported by my USB HDD enclosure. With ubuntu 16.04.3 minimal hdd spin down after 5 minutes exatly, unable to set this time up (hdparm, sdparm, hd-idle, usb power control – nothing works). Im using workaround -touching HDD every 5 min by cron, which keeps HDD awake, but thats not what i long for. Any ideas hot to set up HDD spinning? Desired scenario is HDD falls asleep after 1 hour of inactivity and keeps aspleep until user access. Thanks.
What USB HDD enclosure do you use? Sounds like it’s really shitty!
Can you spin up/down your HDD manually with hdparm? Does this work?
odroid did not work for the default pw in CLI. Have they changed it?
Default password is openmediavault for both, root (CLI) and admin (Web) login.
Hello,
Thank you so much for this blog. I do have one question, though…
I noticed that this is dated from October 2015. I just got my Odroid XU4 yesterday and am setting all of this up for the first time now. Is this information still relevant, or have all these bugs and performance issues been worked out of the current version of OMV?
Hi,
it’s all fixed now.
Just install the latest OMV v3 release and you should be fine.
Great to know. Thank you.
Hi Obihörnchen,
thank you for this great article!
Unfortunately it does not work for me. Even though the individual
benchmark values are similar to yours, the samba performance is very poor, around 10 MB/s.
I am using gigabit Ethernet, a USB3 drive with ext4.
Just summarizing my benchmark values:
dd
write: 44.7 MB/s
read: 107 MB/s
iperf: ~ 900 Mbits/sec both directions
The CPU governor is set to ondemand (‘cat /sys/devices/system/cpu/cpu*/cpufreq/scaling_governor’
shows 8x ondemand) and i also applied the IRQ tuning.
In addition to the poor samba performance I noticed that I get a similar low performance for
copying data from the mmc to the drive and back.
While copying (samba or local) I see a lot of io-wait for the cpu. This can also be seen in the iostat:
$ iostat -x 3
avg-cpu: %user %nice %system %iowait %steal %idle
1.28 0.00 2.81 19.47 0.00 76.44
Device: rrqm/s wrqm/s r/s w/s rkB/s wkB/s avgrq-sz avgqu-sz await r_await w_await svctm %util
mmcblk0 0.00 2.67 38.00 0.67 9558.67 3.33 494.59 0.11 2.80 2.85 0.00 2.72 10.50
sda 0.00 1.67 0.00 81.33 0.00 9601.33 236.10 142.83 1754.59 0.00 1754.59 12.30 100.00
Where is the bottleneck?
Any advice to solve this problem is welcome.
regards
Malte
Hey @Malte,
I had a similar problem. In my case, it actually turned out to be a bad ethernet cable. eth0 was connecting at 100Mbit instead of Gigabit and the speed was limited to 10-12 MB/sec.
-G
Just wanted people to know that the XU4 can to HW transcoding using custom ffmpeg and/or gstreamer.
Dear Obihoernchen,
am having major issues with the harddisk not being mounted properly. mount – a doesn’t do the trick, neither a reboot.
This can only get fixed (no idea why) by shutting down the odroid and then restarting it. And only, if while it is booting there are no PCs connected to the network who are trying to establish a link automatically.
What I found is that this happens always when using the OMV front-end to shutdown the odroid and in abiut 70% of the cases when using the console via ssh to shutdown the box.
Any idea what is going wrong?
just an additional idea: it is a 1tb SATA. When “listening” during the boot it sounds as if the odroid is ready even before the disk has started spinning up.
Do you use a dedicated power supply for it?
Have a look at your dmesg as well. Any errors?
yes, I do have a dedicated power supply. dmesg is not showing anything wrong.
Reboot (shutdown -r) never works, Shutdown – h with power cord off and on for a reboot does work after 3rd-4th attempt
Great article, thanks!
However, I’m having problems getting the big_writes option to work. I added the line as you suggested to /etc/default/openmediavault, but after mounting the NTFS partition the mount command always returns:
/dev/sdb2 on /media/7A60CBAF60CB7085 type fuseblk (rw,noexec,noatime,user_id=0,group_id=0,allow_other,blksize=4096)
This is what is in syslog:
Feb 24 12:02:21 beaglebone ntfs-3g[8399]: Version 2014.2.15AR.2 integrated FUSE 28
Feb 24 12:02:21 beaglebone ntfs-3g[8399]: Mounted /dev/sdb2 (Read-Write, label “Movies”, NTFS 3.1)
Feb 24 12:02:21 beaglebone ntfs-3g[8399]: Cmdline options: rw,noexec,noatime,big_writes,nofail
Feb 24 12:02:21 beaglebone ntfs-3g[8399]: Mount options: rw,noexec,nofail,allow_other,nonempty,noatime,fsname=/dev/sdb2,blkdev,blksize=4096
Feb 24 12:02:21 beaglebone ntfs-3g[8399]: Ownership and permissions disabled, configuration type 7
So it seems that the big_writes option is included by OMV, but is ignored when mounting?
I’m running the latest OMV3 following your upgrade post.
Any ideas on how I could get the big_writes to work?
Thanks,
Sebastian
Hi,
looks like everything is fine. You won’t see big_writes as a mount option. Have a look at the ntfs/fuse process with ps -ef It should show the option.
greetings Obihoernchen!
can you guide me how to enable HDD Temperature Graph, just like you enabled CPU temp and freq graphs, if possible?
and do review my earlier Comment regarding samba transfer rates 🙂
thank you for work for odroid
This will wake up your HDD constantly, that’s why I didn’t build it.
Really nice guide, I will most likely use it when my XU4 arrives. What type of HDD are you using: 2.5 or 3.5 inches? And what capacity? Are you using the more powerful power adapter, recommended for the CloudShell?
Have a look at my benchmark snippet all HDDs are described there.
All are 2,5″ 0,5 – 2TB each.
And I’m using a USB power supply as described in the post as well 🙂
Ok, thank you. I started browsing all your posts and I found the answer already 🙂 I will definitely get a powered USB 3.0 hub. I find it a lot easier to use a 2.5 inches HDD, even with a powered USB hub.
Can’t quite figure out why my writes are still ~30MB.
Bottom of my file looks like:
# Ondemand Scheduler
OMV_CPUFREQUTILS_GOVERNOR=”ondemand”
# Optimize NTFS Performance
OMV_FSTAB_MNTOPS_NTFS=”defaults,nofail,noexec,noatime,big_writes”
# RRDTool graph width and height
OMV_COLLECTD_RRDTOOL_GRAPH_WIDTH=800
OMV_COLLECTD_RRDTOOL_GRAPH_HEIGHT=200
I am admittedly new to linux but I thought I followed the guide pretty well. I am using a usb3 external drive and just got my odroid xu4 today. Any idea what it could be?
You can’t achieve the maximum speed on wifi, you should try it with ethernet. I have ~30+ MB/s over n, and ~60+ over ac.
“Below is a breakdown of actual real-life average speeds you can expect from wireless routers within a reasonable distance, with low interference and small number of simultaneous clients:
802.11b – 2-3 Mbps downstream, up to 5-6 Mbps with some vendor-specific extensions.
802.11g – ~20 Mbps downstream
802.11n – 40-50 Mbps typical, varying greatly depending on configuration, whether it is mixed or N-only network, the number of bonded channels, etc. Specifying a channel, and using 40MHz channels can help achieve 70-80Mbps with some newer routers. Up to 100 Mbps achievable with more expensive commercial equipment with 8×8 arrays, gigabit ports, etc.
802.11ac – 70-100+ Mbps typical, higher speeds (200+ Mbps) possible over short distances without many obstacles, with newer generation 802.11ac routers, and client adapters capable of multiple streams.”
Source: https://www.speedguide.net/faq/what-is-the-actual-real-life-speed-of-wireless-374
Hi there. Thanks four your tutorial.
Is there such one for an environment with Linux and Mac only?
I am intersted in an Odroid-XU4, Ubuntu Core/DietPi combination.
I don’t know whether there is a tutorial out there, but just use NFS instead of Samba and you are good to go 🙂
But even with Linux + Mac you can use Samba as well.
Excellent tutorial.
I got a XU4 and planning to try OMV with it. I have been using a Pine64 as a NAS (samba share) but the speeds are very low (approx. 15mb/s write speed to the attached USB hard drive in my LAN).
My question is how does this combo performs in terms of power consumption (idle/peak)? I’m considering attaching 2 x USB 3.0 4TB hard Drives in RAID mode.
Many thanks.
Hi,
thank you.
For me it consumes about 10W idle with 5 HDDs (idle as well) attached. The odroid itself consumes maybe 3W idle. Under load and with some spinning hard disks it goes up to about 20W.
I decided to give this a go after all.
All were set up OK apart from the fact that I can’t get my HD’s (both USB 3.0) to be recognised by the 2 x USB 3.0 ports. On the other hand, they are recognised no problem when plugged one by one to the USB 2.0 port of the XU4. Any idea why is this happening? Is there any missing driver or anything else I could amend?
Many thanks
Hi Markus.
Please disregard my previous post as I figured out what the problem was. I had to clean the 2 x USB 3.0 ports with rubbing alcohol. Therefore, anyone with a similar problem should try to clean the ports which tend to collect dust particles over time. Now both ports can see my drives without a problem.
However, real life tests do not show good speed results so far. I can move files from my host pc to the XU4 nas with 7-10mb/s (write) which is about 50% the speed of my other nas setup featuring a Pine64 board and a USB 2.0 drive.
My drives are both formatted to NTFS and wouldn’t want to change the file system if possible. Of course, these speeds still have nothing to do with the speeds you presented above, even under the NTFS file system. Something like 60/30 mb/s would be perfectly fine for my needs.
Is there a way to check whether the governor has changed to ”on demand” (I have followed all steps above one by one) or a safe way to determine if my system can achieve optimal read/write speeds?
I also wonder if you updated from Stone burner to Erasmus version? Do I have to run omv updater or is this going to ruin my setup and will eventually have to re-flash?
Thanks
George
Hey,
regarding OMV upgrade have a look at my newest post: https://obihoernchen.net/1451/upgrade-odroid-xu4-to-openmediavault-3/
Do you use the big_writes mount option? Should look like this:
ps -ef | grep ntfs

root       851     1  0 Feb10 ?        00:00:24 /sbin/mount.ntfs /dev/sda1 /media/B4D48115D480DB4E -n -o rw,noexec,noatime,big_writes,nofail

root       938     1  0 Feb10 ?        00:00:23 /sbin/mount.ntfs /dev/sdc1 /media/4A98777798775FFD -n -o rw,noexec,noatime,big_writes,nofail
To check your governor run:
cat /sys/devices/system/cpu/cpu*/cpufreq/scaling_governor
Please run
lsusb -tand post the output.Did you try to benchmark your drives with dd (like I did in my post)?
How would you set up a RAID array with this?
What do you suggest to do?
Simply use the built-in OMV RAID menu entry (I didn’t test it myself but this should work). Or if your data doesn’t change often a simple rsync to a 2nd drive might be enough?
Awesome tutorial! this actually encouraged me to get an XU4 a couple of weeks ago (had a C2 previously but accidentally shorted the GPIO pins while moving, so it was a bitter sweet upgrade)
I followed your posts in threads to this blog (as I also have a ProBox 4 bay plugged in via USB 3.0). hitting approx 70ish MB/s pulling data from the odroid but maxes out ~ 11-15 MB/s writing to it.
firstly through it may have been the network running at half duplex but ran iperf with -r for up/down streams:
————————————————————
Server listening on TCP port 5001
TCP window size: 85.3 KByte (default)
————————————————————
[ 4] local 192.168.2.1 port 5001 connected with 192.168.2.53 port 31980
[ ID] Interval Transfer Bandwidth
[ 4] 0.0-10.0 sec 877 MBytes 735 Mbits/sec
————————————————————
Client connecting to 192.168.2.53, TCP port 5001
TCP window size: 68.1 KByte (default)
————————————————————
[ 4] local 192.168.2.1 port 41271 connected with 192.168.2.53 port 5001
[ 4] 0.0-10.0 sec 785 MBytes 658 Mbits/sec
-not a network issue
-As you’d know the ProBox has its own power supply, so its not a power issue
You also wrote a separate article indicating the second USB3 port shares a IRQ with the ethernet port, but Im not sure which port is the first port
lsusb:
Bus 001 Device 004: ID 19d2:1405 ZTE WCDMA Technologies MSM
Bus 003 Device 002: ID 05e3:0610 Genesys Logic, Inc. 4-port hub
Bus 004 Device 002: ID 05e3:0616 Genesys Logic, Inc.
Bus 006 Device 002: ID 0bda:8153 Realtek Semiconductor Corp.
Bus 001 Device 001: ID 1d6b:0002 Linux Foundation 2.0 root hub
Bus 002 Device 001: ID 1d6b:0001 Linux Foundation 1.1 root hub
Bus 003 Device 001: ID 1d6b:0002 Linux Foundation 2.0 root hub
Bus 004 Device 001: ID 1d6b:0003 Linux Foundation 3.0 root hub
Bus 005 Device 001: ID 1d6b:0002 Linux Foundation 2.0 root hub
Bus 006 Device 001: ID 1d6b:0003 Linux Foundation 3.0 root hub
Bus 003 Device 003: ID 05e3:0610 Genesys Logic, Inc. 4-port hub
Bus 004 Device 003: ID 05e3:0616 Genesys Logic, Inc.
Bus 004 Device 005: ID 152d:0551 JMicron Technology Corp. / JMicron USA Technology Corp.
(not sure if its in the right port, but have tried both with the same result)
ands lastly the hard drives:
/dev/sde1:
Timing cached reads: 2068 MB in 2.00 seconds = 1036.16 MB/sec
Timing buffered disk reads: 302 MB in 3.01 seconds = 100.17 MB/sec
/dev/sdf1:
Timing cached reads: 1988 MB in 2.00 seconds = 995.44 MB/sec
Timing buffered disk reads: 322 MB in 3.01 seconds = 106.95 MB/sec
/dev/sdg1:
Timing cached reads: 1990 MB in 2.00 seconds = 996.44 MB/sec
Timing buffered disk reads: 128 MB in 1.66 seconds = 77.11 MB/sec
Ive been researching during the holidays for 2 weeks straight trying all different things (thought it may have been the OMB build so I swapped to a jessie build and built OMV on it, same speeds)
Close to going bald from pulling my hair out trying to figure out what is limiting my write speeds
Absolutely any incite/advice/help you could provide in relation to this issue would be greatly appreciated!
Hey,
which filesystem do you use?
Did you try to push data via NFS or something else as well, to see whether samba itself is the issue?
On top of that have a look at my post on the odroid forum: http://forum.odroid.com/viewtopic.php?f=98&t=14907&start=50#p172994
Maybe some of this will help as well.
Awesome, about to buy an ODROID-XU4 for the exact same reason! Could certainly use USB3 & Gigabit Lan. Does the fan ever get loud for you at all?
Yes sometime the fan is starting for a few seconds. So I wouldn’t recommend to place it in the bedroom 😉
greetings Obihoernchen!
i have a problem with slow read rates(~30MB) on SMB but write rates (~60MB) are fine
i have:
1x Seagate 1TB EXT4 USB 3.0 & 1x WD 1TB NTFS USB 3.0
both connected to 4-Port USB 3.0 bus powered with 5V/2.5A power adaptor
odroid and my PC are connected to Gigabit network
can you help me sort out this problem:
kudos and thanks again for this useful tutorial!
here are my stats of both HDDS
SEAGATE (EXT4)
————————-
SMB Rates
Write: ~60MB
Read: ~33MB
#hdparm -Tt /dev/sda1
/dev/sda1:
Timing cached reads: 1416 MB in 2.00 seconds = 708.82 MB/sec
Timing buffered disk reads: 292 MB in 3.01 seconds = 97.02 MB/sec
#cd /media/sda1
#dd if=/dev/zero of=tempfile bs=1M count=1024 conv=fdatasync,notrunc
1073741824 bytes (1.1 GB) copied, 12.8484 s, 83.6 MB/s
#echo 3 > /proc/sys/vm/drop_caches && dd if=tempfile of=/dev/null bs=1M count=1024
1073741824 bytes (1.1 GB) copied, 11.4987 s, 93.4 MB/s
WD (NTFS)
——————
SMB Rates:
W ~63MB
R ~32MB
#hdparm -Tt /dev/sdb1
/dev/sdb1:
Timing cached reads: 1354 MB in 2.00 seconds = 677.23 MB/sec
Timing buffered disk reads: 292 MB in 3.01 seconds = 97.06 MB/sec
#cd /media/sdb1
#dd if=/dev/zero of=tempfile bs=1M count=1024 conv=fdatasync,notrunc
1073741824 bytes (1.1 GB) copied, 19.5976 s, 54.8 MB/s
#echo 3 > /proc/sys/vm/drop_caches && dd if=tempfile of=/dev/null bs=1M count=1024
1073741824 bytes (1.1 GB) copied, 10.7175 s, 100 MB/s
hi,
i am not able to use cloudshell-lcd plugin with this OMV image!
Did you get it working? any help appreciated
Regards
Star
Hey,
no sorry I don’t have a LCD :/
Hi Obihörnchen,
thank you for this great tutorial!
Especially the monitoring of cpu freq. and temp. is very cool.
I would like to enhance this with an additional graph for the fan speed (so I can check the impact of different fan speed strategies on cpu temperature and the time the fan is active).
Can you give me a hint how to do this?
Regards,
Christian
Hey,
first of all you have to check whether you can read the fan speed from /proc/… or /sys/… (I don’t know whether the kernel exports this).
Then you can create a script like this one: https://github.com/Obihoernchen/openmediavault-monitoring-odroid-xu4/blob/master/usr/local/bin/cputemp
Afterwards you have to create all the other files you can find in this repo (collect.d and .js file).
Let me know if you can get the fan speed from somewhere.
If yes I may add it myself because I think it’s a nice addition.
you can find fan_speed (and many others) from
/sys/devices/odroid_fan.14/
it sure would be a nice addition to get fan_speed graph
thank you for your awesome tutorial
i found a guide for fan setting:
you can set a rule for udev, by creating a file in /etc/udev/rules.d with the desired settings, I used 60-odroid_fan.rules as the name on my system. The following should work on either an XU3 or XU4 as it matches based on the driver name of odroid-fan rather than the kernel name which is different in the two versions:
DRIVER==”odroid-fan”, ACTION==”add”, ATTR{fan_speeds}=”1 20 50 95″, ATTR{temp_levels}=”50 70 80″
maybe it interest you
Hey,
thank you for you for your amazing work.
one question:
is it possible to install a desktop enviroment on top of this?
after installing lxde the ip still pops up and nothing happens
Hi,
yes should be possible but I don’t have one installed and never tried.
So I can’t help much :/
Thank you for your reply.
do you maybe know where the script is running that shows the ip on the screen? i think that that script is blocking the bootup of the desktop enviroment
Thank you for this awesome set of instructions. I set all the CPU governor settings; however, I am seeing very slow iperf tests in (-d) simultaneously bidirection. Send: 400+ Mbits/sec Receive: 70Mbits/sec. I suspected a duplex issue; however, it appears the duplex is correct. Any suggestions of where to look?
thanks, problem disappeared with a refresh of OMV.. strange but good it’s sorted!
thanks again for the help
cheers
Hi, titles are fine and it does update automatically every 15 minutes. The only problem is that once I click refresh I get the “RPC service not found (name=Rrd)”
Can you confirm everything works on your end with OMV 2.2.2?
cheers
Hi,
yes just tested it. Everything works fine on my side.
I have no problems with a manual refresh.
OMV 2.2.2, too.
(I should have mentioned I’m running the latest OMV version, i.e. 2.2.2)
Cheers
Hi On refresh of the graphs I get
RPC service not found (name=Rrd)
Error #2000:
exception ‘OMVException’ with message ‘RPC service not found (name=Rrd)’ in /usr/share/php/openmediavault/rpc.inc:93
Stack trace:
#0 /usr/sbin/omv-engined(500): OMVRpc::exec(‘Rrd’, ‘generate’, NULL, Array, 1)
#1 {main}
Any idea?
Thanks a lot, great post btw
mhh strange. I never saw this kind of error.
How do your tab titles look like?